Introduction
Start your work on Part Five by reviewing what you’ve achieved so far and reflecting on which projects you’ve enjoyed most.
There have certainly been times when studying long distance without attending specific instructional lessons have been challenging. As a relatively new artist, who attended an academic school that did not support the arts, there was much I did not know about techniques. Of course there are many instructional books, articles and video instructions available, but these don't always tackle problems that arise as you work. Saying that though, the process of self exploration and experimenting has also been valuable. It has forced me to solve my own problems and manage my own short comings.
I can definitely see how my work has progressed from Part 1 till now. In the beginning it was more important for me to grasp what I see. Learning how to recognize tonal variations and working with colours. In Part 1 I completed a still life of a bowl of apples, which is pretty realistic. Painting with such a crisp realism was something I had not done before and even though some may consider the composition a tad boring, for me it was about capturing the true subject, so I am impressed with how it turned out. Later, as I became a bit more confident, I was able to branch out a bit more and actually explore various styles in order to make the work my own.
I very much enjoyed part 3, as I love working with the human figure and face, though painting accurate facial features are challenging. In on of the exercises I painted a female figure using palette knives. This was my first attempt at working properly with knives and I absolutely loved the textures they created, as well as the expressive nature of the streaks. It immediately creates an energy and mood in the painting.
As I enjoyed working with the palette knives so much, I decided to use them for a landscape exercise where we had to express mood or atmosphere. I painted a Venus canal scene and yer again the knives delivered great textures and a great impressionistic feel. This made it an easy choice for me to decide to use it in my final assignment in Part 4. I created an expressive scene of a Hong Kong street scene. Keeping colours vibrant and energetic. These two paintings really took me by surprise as I would never have considered myself a landscape (Urban) artist, but something about the harsh lines and geometry are quite satisfying.
I also completed some of my exercises using water colour as there are so many different techniques to play with when using this medium. The family portrait I did is a personal favorite, as it reminds me of my trip to China.
Which tasks have you found the most challenging?
I found most of the still life tasks challenging in Part 1 and 2, as these are not my subject matter of choice. I struggled to create interesting set ups for objects, especially as living in Hong Kong, our apartments are very small and it is hard to create proper set ups.
I was also very nervous about Part 4 and the challenge of painting landscapes. Again, this is not my subject matter of choice, so I really had to look at a lot of work from others to help provide me with inspiration and ideas. I was happy that urban scenes counted as landscape, and mostly chose to stick with that, which made an easier. But I can certainly say that I am not really one for painting outside.
What areas require more practice?
I am not a very diligent sketcher. I know that sketching can be a way to help you refine what you observe. It can also help you with composition and proportional issues before you jump into a project, and really have been trying to sketch where I can, even if just doing simple outline sketches to play around with compositional ideas. Playing around with proportions when working on life drawings is still something that requires practice, particularly when working on the face. Working with oils, is still a learning curve for me. Mixing colours or trying work with different brushes and blending is still something I want to experiment with more. I have delved into using washes and simpler palettes, so I would like to do more of that. An area where I have grown a lot, is stepping away from being t specific about what I see, and starting to paint with more feeling and expression, I would like to continue breaking down some of my barriers and allow myself to make more mistakes.
Research Point
Look at a range of paintings with particular attention to the way the paint has been applied. For example, look at the paintings of Monet, Pissarro, Cézanne, van Gogh and the Expressionist painters. Look at some twentieth-century pastel paintings and make notes about the range of effects you find.
Monet
Monet often used many painting techniques on one canvas, including working with dry paint, and wet-on-wet. Two techniques he used quite often and became most notable in the art world. The first is tache, meaning to blot or stain where paint is applied boldly and thickly with flat even-loaded strokes. The second is Impasto, which is also the application of very thick layers of paint, but here different strokes or brush sizes are used. He worked with spontaneity and energy, often using vibrant colours straight from the tubes onto the canvas. He painted spontaneously using a limited palette.
Check out a link with a guide to Monet's techniques here.
Check out a link with a guide to Monet's techniques here.

La Promenade, Monet, 1875
|

Impressionist Sunrise, Claude Monet, 1872
|
Pissarro
Camille Pisarro,1830-1903, was a Dnaish-Frnech Impressionist painter. His favorite subject matter was the day-to-day life of French peasants, combining figures and landscapes. He was fascinated by the effects of light and atmosphere in nature. His style was mostly influenced by Neo-Impressionism (pointillism) which explores the contrasts in colour theory and challenges they way we see the world.
The term Neo-Impressionism refers to a pictorial technique where color pigments are no longer mixed either on the palette or directly on canvas, but instead placed as small dots side by side. Mixing of colors takes place from a suitable distance, in the observor's eye, as an "optical mixture".
Though I believe you can create some great visual effects and textures with this technique, I think is must be very time consuming and requires a great deal of timing to get the colour impressions correctly.
Check out a speed painting of this technique in action here.
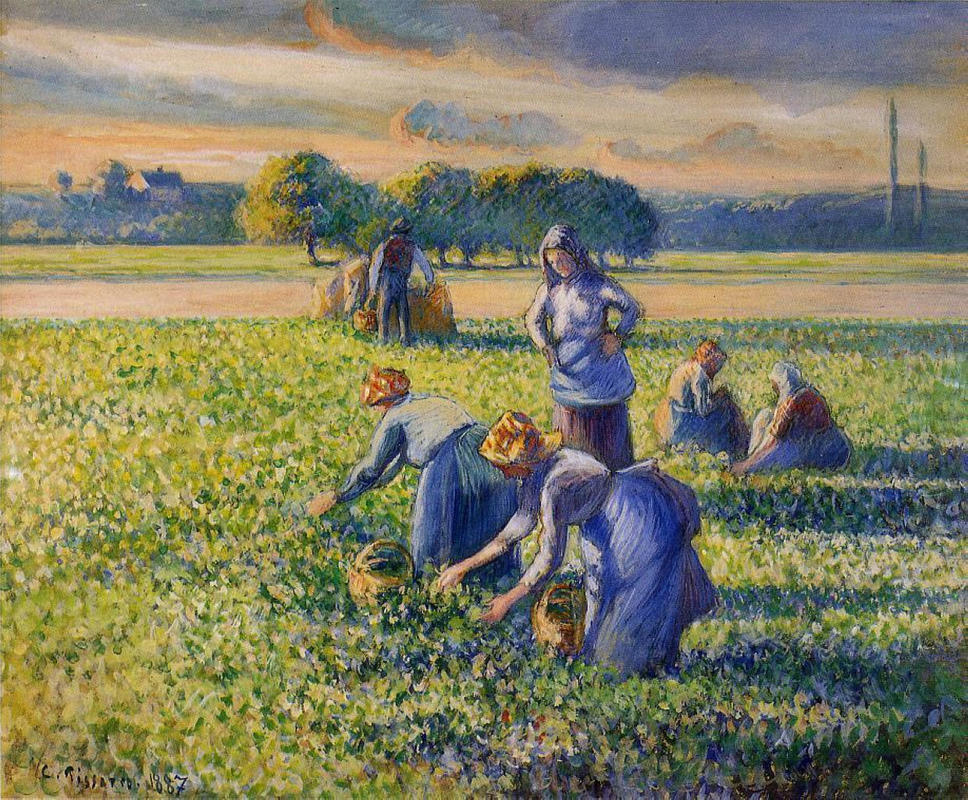
Picking Peas, 1887 - Camille Pissarro
|

Camille Pissarro, Boulevard Montmartre, Spring, 1897
|
Van Gogh
Vincent Van Gogh, 1853-1891 was famed for his bold, dramatic brush strokes which expressed emotion and added a feeling of movement to his works. It´s thought that he often used paint straight from the tube, a technique called, Impasto.
Impasto is when paint is applied thickly from the tube, like toothpaste. colors are often mixed on the canvas making strokes and lines visible as if they are popping out of the canvas.
Van Gogh liked using vibrant colours. Choosing his colours to create mood or atmosphere, rather then trying to make realistic depictions.

Noon - Rest from work, Van Gogh, 1890
|

Olive Grove - Orange Sky, 1889 - Vincent van Gogh
|
Chuck Close

Georgia, 1996, Chuck Close
|
Moving into the 21st century, Chuck Close is a contemporary artist who has put a modern twist on the idea of pointilism. As a photographer and artist, he is better known for his photo realistic portraits painted on a large scale. But he has also taken the idea of Neo Impressionism and colour theory to the next level and produced wonderfully abstract portraits. Using a computer-aided method of industrial weaving he has produced a modern tapestry almost making the work feel like a glass painting. His use of colours are bold and abstract and placed meticulously to create a type of illusion. |
20th Century Pastel Painters
In the mid 18th century, Pastel Paintings were the height of fashion and called 'crayon-drawings'. Artists like Da Vinci and Michaleangelo often used chalks in their sketches and preparations for paintings. Artists can use pastels for both drawing and painting. They are often used in combination with other media, including pencil, charcoal, chalks and different paints. Pastels are able to create broad paint-like strokes and can be blended,smudged, or built up in thick impasto-style layers. Because of its solid buttery appearance, a drawing completed all in pastels, is called a painting and can have a similar appearance to an oil painting.
Famous modern pastelists include, Edgar Degas, James Whistler and Pablo Picasso.
Famous modern pastelists include, Edgar Degas, James Whistler and Pablo Picasso.

Two Dancers, Degas, 1898
|
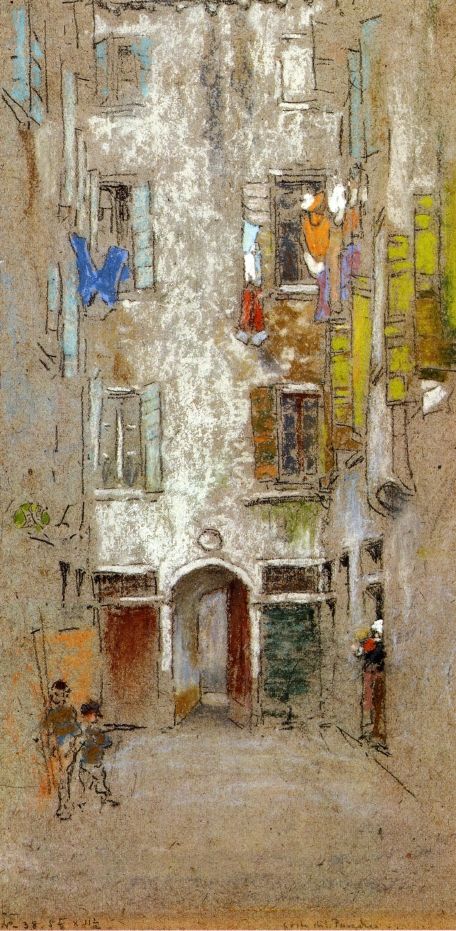
James Abbott McNeill Whistler (1834-1903) Corte del Paradiso
|

Woman and cat, Pablo Picasso, 1900
|
Examples of work from 21st Century Pastel artists
|
Wolf Kahn is a German artist using a unique blend of Realism and American Impressionism. He enjoys pushing the boundaries of colour, using sweeping colours to create rich and atmospheric work.
|

Wolf Kahn
Green at the Bottom, Blue at the Top, 2016
|
 Woolworths, David L Wallach
Contemporary artist David L. Wallach came to use pastel for his self-described "primitive realism", an evolution of his traditional impressionistic style.
He first started with an underpainting of water color and the worked up his layers with soft pastel on waterproof sandpaper.
I have watched videos before where artist used water colour in conjunction with pastels and when done correctly, the effect can have a great impact, as it enhances colours and brings additional texture.
Exercise: Impasto
Work on prepared surfaces to produce several experimental paintings in which you try out the following effects:
1. Using a brush - **Please note this is unfinished**
Paint a simple still life with fruit. Arrange three or four pieces of fruit in front of you and decide on the main colours you will need. Set out a range of colours on your palette and a thickening gel if necessary. Without mixing colours together, load your brush heavily and deposit thick smears of paint roughly in the shape of the areas of colour before you. Now roughly blend colours with your brush on the canvas. Work quickly and don’t be tempted to get involved with careful blending. Allow the textures of your rough brush strokes to sit on the surface and the multi-coloured streaks of paint to remain unmixed.
I worked with think layers of paint trying to keep colours quite crisp and bright. I usually begin with putting down a mide tone of a specific colour and then applying highlight and shadow contrasts of that colour.
My goals was to create texture through thick and obvious brush strokes, while maintaining vibrant colours. I succeeded in creating thick strokes and texture. Looking at the colours again, I'm happy with the vibrancy of the colours, though I wonder what the table cloth might have looked like if I chose to use an emerald green instead. Overall though, I think the depth created through subtle tonal variations are effective and give the painting depth.
My goals was to create texture through thick and obvious brush strokes, while maintaining vibrant colours. I succeeded in creating thick strokes and texture. Looking at the colours again, I'm happy with the vibrancy of the colours, though I wonder what the table cloth might have looked like if I chose to use an emerald green instead. Overall though, I think the depth created through subtle tonal variations are effective and give the painting depth.
2. Using a painting knife
Broad areas of paint can be applied with a painting knife or you can create sculpted effects with the blade of the knife. Knives come in several shapes (pear, trowel or diamond shapes, for example), and they can be used differently for different effects. You could use stiff card or a kitchen knife to apply paint in broad, bold swathes. Apply some broad areas of colours using a rough scraping motion. Leave some areas of paint flat and then work with the point or side of a knife to create textured effects in other areas of colour.
I found a great reference photograph of a street scene at night with the snow falling. I knew I wanted to keep the pallette simple, as I wanted the shapes and lines created by the architecture to stand out. My goal was for the lines and shapes of the buildings to be placed with a more loose interpretation, so the viewer would at first not be sure of what they are looking at.
I began by first placing down an earthy underground, not worrying about covering the canvas perfectly. I then blocked out the shapes of the buildings with brown. I paid attention to perspective and suggestive shapes, but was not overly strict about creating an exact representation of the scene. I then used lemon yellow and medium yeloow to add a contrasting colour to serve as the highlight in the image. I kept the yellows more concentrated around the lamps, to also imply reflection of the light. I thenused a darker brown to give additional contrasts and redefine some of the lines, particularly around windows and doorways. The final step was to add the snow. Using white and turps to create a more fluid texture, I used a flat brush to flick the paint around the canvas.
I believe that I accomplished my goal of creating an image that is not immediately interpreted. You have to look at it and refocus to understand the scene. I quite like some of the harshly defined lines and textures created by the knife. I am not sure whether the yellow is a perfect match, it looked different in my head when I was planning it, but then, the image need a contrast, and I'm not sure whether another colour would have worked.
3. Scratching
Apply two or three colours thickly with a knife or piece of card, allowing some areas of colour to overlap. While the paint is still wet, draw into this using a stick, the end of a brush handle or a pencil. Allow your drawing implement to drag colours into each other. A technique for scratching into wet paint that can be used with great precision for particular effects is called sgraffito. Find out what you can about this effect which was used by the old masters as well as by contemporary artists.
I chose to work with Acrylics for this exercise as it was experimental and I didn't want to waste oils on something that might not work. I had a reference image that I fond of this old abandoned rail stop which I quite liked. I know the initial brief said to use two or three colours to scrape, but for what I had in mind, I thought a solid colour would work better.
My goal was to scratch out the areas that represented the highlights in the image and then ad a shadow tone, giving the final product a sketchy feel.
I applied a very thick layer of a black, white and light brown mixture. Then I had to use my free hand to scratch out the paint while looking at the reference image. I used a flat square palette knife to scrape out the paint and as it gathered paint together I placed it in other areas to create volume and texture. I had to work very fast as the acrylic paint dries really fast. I then used a small flat brush to apply black paint to create the outlines. The advantage of the acrylic paint drying so quickly, is that you can create sort of dry brush texture which almost make the image appear to be done with charcoal.
This was a fun experiment and I was surprised and pleased by the end result. The flat knife created these great hard lines and edges which created a great composition. I like the sketchy feeling created by the black layer afterwards. It also makes the contrast between the background and scratched out highlights stand out more.
Exercise: Dripping and spattering
For this exercise, prepare a large sheet of paper or cardboard and spread around plenty of newspaper.
Mix up several colours into dilute solutions. You can plan effects by choosing colours carefully and mixing in advance, or mix more colours as you progress.
When you’re ready, apply paint in as many different ways as you can:
- Dip a big brush into paint and flick it onto the support.
- Dribble the paint from a container.
- Build up layers of colours and allow them to run together.
- If you feel an impulse to add another colour in a particular way then do it.
- Be aware of how deep tones and light tones or pure white could add a feeling of receding space or layers.
Try making several paintings in this way. Notice how paint behaves and how colours run together.
Is there a point where you feel that you have finished?
Make notes in your learning log. How could you exploit some of these paint effects in your future work?
Watercolor Examples
I am often watching videos of artists working to get ideas. I watched a video of this artist creating interesting splatter backgrounds for her watercolour paintings which I really wanted to try. You can view the video here. Despite using the same technique and paper, I could not quite get the paint to behave like it does in her video, but I still manages to create different and interesting effects. My goal was simply to explore different application techniques to create atmosphere.
To begin, I knew I wanted to use faces as there is something about a face that already conveys a mood. I started by paging through all the magazines I have at home and ripping out pages that had exciting angles to serve as inspiration. I chose three images that I really liked and created a simple pencil outline sketch. I then used masking fluid to block out areas that I wanted to keep as stand out highlights. I then started the splattering technique differently for each image, which I will explain below.
#1
I sprayed the surface with water and then dripped on blue, green and purple. I then picked up the paper and allowed the paint to run around. I then used charcoal to complete the drawing, which I think added a great textural difference. The last step was to remove the masking fluid.
#2
For this painting a I kept my page upright and began painting from the top of the page, just allowing the colours to run down naturally. I worked with blue yellow and red. Once these were dried and wanted the face to be a real stand out feature, so I used black to fill the face. The final step was to remove the masking tape. The stark contrast between the black paint and the white paper is very effective.
#3
For this image, I really wanted the splattering effect to be more prominent in her hair to make it a bit ethereal. I applied blue and red to the hair area first. picking up the paper and allowing the paint to move around naturally. Once this was dried, I used different tones of yellow to fill in the skin. For this I kept the paper upright, allow the paint to run down naturally. I used a diluted blue to create shadows. The final step was to remove the masking fluid.
Even thought the technique I initially tried to imitate did not turn out as planned, I'm still very well pleased with the end result. These images have a dreaminess about them, which makes you want to look at them over and over again.
Oil
In Part 4 I tried out a technique where you apply the paint first and then add turps later to created drippings. This time I wanted to dilute the paint first and then make it drip. I knew that drippings would also most creating a feeling of rain or emotions, which is why I though it would suit the idea of painting a musician. The idea was to create a musician who is 'bleeding/ crying' for their music.
Using a couple of reference images, I created an outline. I then mixed burnt umber and started dripping that over the background. I wanted their to be a contrast between the colours, so I kept the musician in black and white. Once he was dried, I dripped burnt umber again. I felt like it didn't look moody enough, so made a mixture of paynes grey and turps to drip over again. It turned out a bit darker than I had anticipated. As a final layer I used a gloss to cover and seal the whole image, but I was a bit impatient, so some of the colour still spread. The image now feels a bit dull to me, which is the opposite to what I was trying to achieve.
Though the painting did not quite turn out the way I expected, there are still a few good things that I learned from it. The texture created when the paint runs down with the turps, is very special, it reminds me of the lines on a typographical map. I also learned that it is very important to let layers be absolutely dry, especially when working with washes or glosses.
Research Point
Find out what you can about the Abstract Expressionists and, in particular, the style of painting called Tachism or ‘Action Painting’. Look at the work of those artists who developed this style of spontaneous, expressive painting which worked by the artist making large gestures and exploiting accidental effects. Look at the work and ideas of Hans Hartung, Franz Kline and Jackson Pollock, amongst others.
Abstract Expressionism
This was a label given to an art movement that started in New York during the 1940s. It is meant to describe painters who used vibrant colours and abstract forms, but who also painted with vigorous and violent expressions. These artists use their works to express universal themes and emotion and were soon respected as the first artists of American avant-garde. Though the movement was mostly made up of painters, it also united sculptors like, David Smith and photographers like Aaron Siskind.
|
David Smith was greatly influenced by Cubism, Surrealism and constructavism. He was one of the first artists to work with welded metal. His work was a type of collage. He liked finding large geometric objects and combining them in figurative motifs. His compositions challenges the viewer bothe intellectually and emotionally. |

David Smith: Hudson River Landscape, 1951 - Sculpture
|

Peeling Paint, Aaron Siskind Photograph
|
Aaron Siskind started out as a social documentary photographer. His work was later influenced by Abstract Expressionism he began to approach picture taking differently. He framed his images with close-ups, focusing on line, texture and visual rhymes, creating a more abstract view of the world. |
Hans Hartung
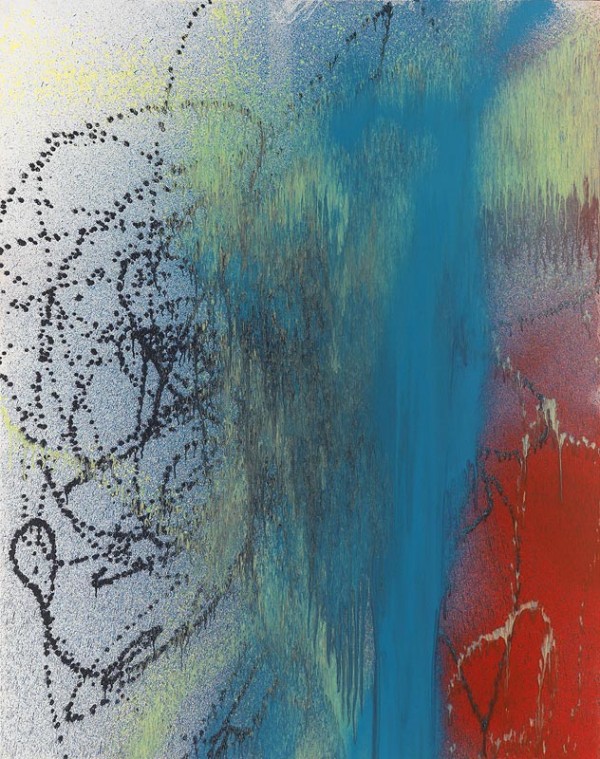
Hans Hartung, T1989-A7 1989
|
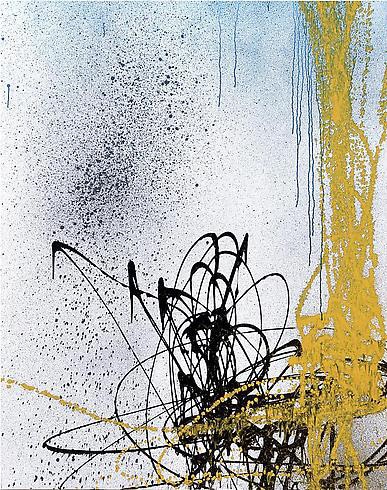
Hans Hartung, T1989-A4, 1989
|
He was a French Artist known for his abstract work in painting, sculpting and printmaking. His work consisted of sketchy-styled scribbles and mark. He often scratched the surfaces of his canvas and worked with a variety of media and colour. He steered away from formal compositions and favored working spontaneously and with gestural approaches.
|
Franz Kline

Horizontal Rust, Fran Kline, 1960
|
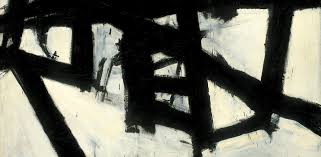
Mahoning, Franz Kline, 1956
Franz Kline was an American painter who had a great impact on the Abstract Expressionist movement.He is best known for his large black and white paintings and minimalist approach. He made use of powerful lines and motifs in order to engage the viewer physically through his gestural paint applications.
He was also referred to as a minimalist, due to his simple compositions and limited palette. I think one would need to be quite brave to paint this way. Deciding when to stop or how to compose these limited strokes. |
Jackson Pollock

Lavender Mist, 1950, Jackson Pollock
|
One of the most popular artists in the Abstract Expressionist movement. Critics often described him as an artist who hurls paint at the canvas with a stick, but they loved it.He used techniques of dripping and splattering paint. Exploring not only with expressive colours, but highly gestural ways of applying paint. His methods were meant to reflect his inner mind.He applied many thick layers which also helped create interesting and mesmerizing canvas textures."At times they could suggest the life-force in nature itself, at others they could evoke man's entrapment - in the body, in the anxious mind, and in the newly frightening modern world." (TheArtStory)
|
Robert Motherwell
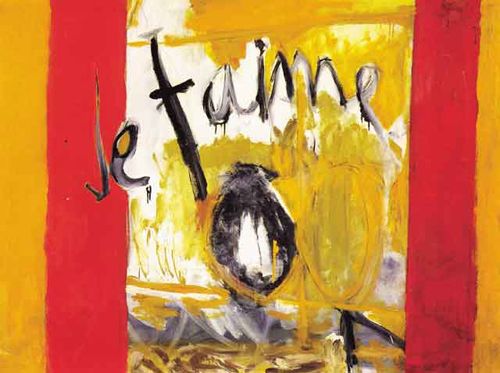
Robert Motherwell, Je t'aime No. 2, 1955
|
Robert Moterwell is an American abstract expressionist painter and print maker. His work was driven by history, philosophy and European modernist traditions. His paintings feature bold shapes and colours. He like working with the contrast of restrained strokes, juxtaposed with boldly gestural strokes. He liked creating contrasts in his work, from the theme to the techniques.
Je t'aime No. 2 is perfect example of his expressive and emotionally charged brushwork along with his bold contrasting colours. Another of his trademarls was the use of shapes. The red lines forming more defined rectangles and what looks like an egg shape in the center. |
Exercise: Preparing a textured ground
• Glue – PVA or liquid latex glue for sticking down materials and for creating glazes and textured effects. Not all PVA is stable once wet and may remain water-soluble. If you’re using PVA over acrylic to create shiny finishes, check the properties of the PVA first.
• Varnish – the safest material to use to create glossy effects is specialised varnish for either oils or acrylics.
• Gesso – for creating textured relief effects.
• Rags, torn paper, cardboard, grasses, sticks, leaves for adding textured interest.
Prepare one or two textured grounds using some of the following ideas:
• Make interesting textures with collage by attaching patches of paper, rag or card. Secure this to your support with heavy-duty glue such as PVA or latex glue. Tear out coloured photographs from magazines – these can form a focal point if left uncovered by paint.
• Secure organic materials such as grasses, sticks, pressed flowers or leaves to the support or add them between layers of paint. The relief effect of these materials catching the light will alter the appearance of your picture as you move around it.
• Dripping and pouring PVA or acrylic medium can make an interesting surface with lines of medium hardening and creating divisions in the picture surface.
• An application of gesso across the support in varying thickness can be worked in to create a powerful textured ground. You could draw or scratch into it or model it with a simple tool like a small piece of card used as a spatula.
Working with gel mediums

Having worked with gels in Part 3, it made me think about how those textures would be really great to mimic the feeling of a storm. I had made a sketch in Part 3 of a woman facing the storm and wanted to try and recreate that as a painting. My goal was to use texture to create a sense of movement.
I started with a background of plain grey. I then sketched out the scene with charcoal, applying two types of gel medium. The one is just a plain gel, while the other contains pumice. I decided to work with blues and greys for the background, bit later added green, which I regretted later. I was not happy with the shape the painting was taking, and decided to switch over to knives with the hopes that it would help. No matter what I applied, it just didn't go down correctly, so I went slightly crazy and kept trying to improve the image. I gave up in the end, as I was already upset at how much paint I had wasted on this disaster.
So what went wrong?
- The initial composition and choice of subject was a mistake. It worked as a sketch and could potentially work as a watercolour, but I don't think it is suited for this idea.
- The colour choices did not come together. the were over blended and did not really compliment each other.
- The textures created with the knife, did not read well on the skin, as it looks like she has leprosy, which again could also be due to poor colour choices.
There were definitely some interesting textures created on the canvas, which could look great on another composition or subject matter.
Working with paper
During my previous study unit, we had to do some research of artist who worked with collages. There were many examples of the created these textures grounds with news papers, album covers and more. We had to create our own collage and think about what the images would say. I created one that highlights the rigorous and often over exaggerated process of a female getting her face 'perfect'. I wanted to continue with this idea, but incorporate more into a painting.
Goal: Create a textured ground that hints at the theme, which is the pressure of beauty.
The first layer is a collection of articles, mostly about what to wear or eat or how to exercise. The all tell you about how to improve and change. the next layer is a collection of faces form various angles. An the final touch was words that call out the ideas or expectations that are placed on woman. I then covered the canvas with two layers of Modge Podge to seal them in. I wanted the painting to show frustrations, so I used a reference image of a woman pulling her hair out. The painting was done with acrylics. I kept a simple tonal palette of black, flesh, white and brown. I wanted it to be sketchy and loose, so the images and words in the background could still be visible. I used a thin wash of blue and gold to fill in the rest of the background.
I like how the gesture and facial expressing immediately brings forth the idea of frustration, which forces the viewer to then look at what caused the frustration. This is when you start noticing the works and images, and the message starts coming together. I am happy with the overall look, though working the layer of modge podge created many ripples in the fine magazine paper, which I would have preferred to be flat.
Exploring texture with Printmaking
I attended a printing workshop which was a great opportunity to explore the effects of different texture. We did several exercises during the day:
- creating our own textured print with various materials.
- using textured materials and stencils to create prints.
- using lino prints to create images
- transferring photographs with taped and water.
It was a fun and creative day. I have always wanted to create a lino print. My zebra print is one of the favorite things that I have made.
Exercise: Mixing materials into paint
Collect together a selection of textural materials that could include the following: sand, earth, rice, crushed peppercorns, flour, salt and broken eggshells. Mix a bit of each of the materials into a mid-toned paint colour and apply it to a prepared support. You could try out your textured paints on one large sheet of paper or card or on several small scraps of paper. When the paint has dried, look at the textured effects and add other colours either in patches or in a dilute wash across bigger areas of the painting. You could wait until this paint has dried or add highlights straight away.
The textures you’ve created in these exercises can be further enhanced by the introduction of gloss or matte effects. A high shine added by a glaze of diluted PVA or varnish can really bring out relief effects. The contrast between flat matte areas of a painting and highly glossed areas can make for stunning visual effects.
The textures you’ve created in these exercises can be further enhanced by the introduction of gloss or matte effects. A high shine added by a glaze of diluted PVA or varnish can really bring out relief effects. The contrast between flat matte areas of a painting and highly glossed areas can make for stunning visual effects.

I decided to work with rice and acrylic paint for this exercise. When I thought ahead about how the rice would stand out boldly on the canvas, it made me think of rain drops. I had worked on an idea in part 3 to have a figure in the rain and slightly being outlined by a light, but I never created a painting of it, so this was a good exercise to use it.
My goal was to capture a sense of illumination on the canvas.
I first mixed black acrylic paint, rice and some gel medium together. I then used a sponge roller to roll it out on to the canvas. This was not as easy, as the rice tended to clump together. Once this was dry and painted an outline of the composition I wanted to use. Once the outline was on, I realized that there should not be rice in the areas that the umbrella is blocking and decided to scrape those off. This was a time-consuming and tedious task, as they were well glued on thanks to the gel medium I added in the mix! None the less, I got them off and what was fortunate, is that it left a great imprint texture. I used phtalo blue and turquoise (undiluted) to fill in the figure. I then and orange wash to start creating light. I kept the canvas upright to allow the wash to run down, also mimicking the idea of water or rain. As I got closer to the light source I used more concentrated colours of orange, yellow and white. As a final touch I used a slightly diluted white to brush over some of the rice grains.
I think that I have achieved my goal of illumination. The washes really helped to create a glow on the image. I liked working with just the two tones of blue. It is simple yet effective at creating a contrast idea of light. I do wish that the rice had spread better over the canvas as I feel like the clumpy areas are distracting. It is not the best piece of art ever produced, but I enjoyed creating the texture and working with the acrylic washes, as I had not really done this before. I has given me a new appreciation for the possibilities available when working with this medium.
Exercise: Abstraction from study of natural forms
In this exercise you can abstract by looking very closely at a familiar natural form and expanding what you see in an arrangement of lines, shapes and colours. You could study a highly coloured flower or leaf or butterfly wing or examine closely a highly structured form such as a rock crystal, a shell or seed head. To get to grips with the compositional possibilities, tonal arrangements and colours, you may wish to make studies first in your sketchbook.

|

|
I cam across this great image on Instagram with the tree roots growing and twining in various shapes and directions. I have always loved the patterns formed by these tree roots and thought that the shapes created were interesting. I started with a sketch, trying to capture the fluid and swirly motions of the roots, but found it quite difficult. I then thought about how I could contrast that idea, as many abstract works are often the opposite of what you expect. So instead of soft swirly lines, lets use hard geometric lines. Instead of harmonious soft colours, let's use bright contrasting colours. So I set out to create an opposite interpretation of the original image.
I decided to work with acrylics for this again, as it has a faster drying time and I knew I was going to work with tape to help me create hard lines.
My goal was to create a vibrant interpretation of shapes and lines inspired by the original composition.
I first placed down a strip of tape to create the divide between the roots and water. I used three tones of green, and three tones of blue, placing them in dots over the canvas, so they would blend systematically as the brush moved over the canvas. I then proceeded to create strips of red, orange and black using tape to make the hard lines precisely.
This was really just an experiment and an opportunity to explore. It is not the kind of thing I typically paint, but it was good to try a different technique. I liked the process of thinking about opposite interpretations and pushing ideas outside of the box, but I would still like to work on the execution of those ideas.
Exercise: Abstract painting from man-made form
With the same degree of close scrutiny and analysis, study a man-made object (anything from a piece of kitchen equipment to an engine part). Focus close in on one part of it and try out different viewpoints. Isolate areas or particular details and and work on several studies in your sketchbook until you have an abstract composition that you can develop and enlarge into a painting.
So many abstract paintings are blocks of colour, or splashes of light, or blocked out shapes with contrasting textures. The kind of paintings you always see up in office buildings. Though I often like these compositions and colour combinations, I find it hard not to have some sort of image in mind to create a composition. As I have been a bit more into buildings and cityscapes since part 4, I wanted to use that as my inspiration.
My goal was to create a composition that is abstract, but also recognizable as a cityscape.
I first began by painting on gel pumice medium. The I used a mixture of blues and emerald green to create the background. I wanted to use orange to compliment the blue and created a brighter contrast. Her I switched over to working with a palette knife, as I love the textures created when spreading the paint. I didn't work from any images, I simply starting placing down shapes where I felt they were needed. I then did the same when applying the black lines. Once these layers were dry, I started added some highlights, using light blue, white and yellow. Again, these were not particularly planned, I would step back and look at the composition to decide where the highlights should go.
I love the combination of textures created on this painting, as well as the colour combinations. (The contrast between the blue and the orange did not photograph well) You certainly get a sense of it being a cityscape, but there are also enough other shapes on the canvas to draw your attention away from what is obvious. I would definitely work with this technique or style again.
Art Central Visit
Art Cetral is a big show with over 100 galleries that takes place at the Central Harbourfront. There were many interesting textures, installations and experimental pieces.
Assignment five: A series of paintings on a theme
Throughout this course I have started increasingly working with knives and oils and so this will be the connecting theme to all my paintings. I suppose I also could have stuck with similar subject matter, but as the challenge is to push my palette knife skills, I would truly only be able to do that, if I was painting various subject matter. I knew that I wanted to work on an urban scene, as Assignment 4 was one of my favorite paintings to create. I also wanted on to involve a person and one to involve animals.
Goal: Use palette knives in various ways to create interesting textures and compositions
Goal: Use palette knives in various ways to create interesting textures and compositions
#1 Mid-level Blues

Living in Hong Kong, there is no shortage on high rises. They often create really interesting shapes and lines, which are particularly great for creating perspective. The roads leading into an endless swarm of buildings sucks the viewer into it. I took a great photograph one day when waling around in Midlevels, which I wanted to use. I knew I wanted to keep a monochrome feeling to it and work with various blues.
I started by creating a grey ground. I applied the paint quite thick and with a wide flat brush. The brush left some thick strokes at parts, which ended op creating great textures once I started working with the knives. Next I used a black wash to mark the outlines of the buildings. I first worked with phtalo blue to put the darkest areas in place, but also to create some stark outlines. I was planning to then work with ultramarine, but because of the grey ground, the contrast was not strong enough. I mixed the ultramarine with turquoise to find a middle ground. I then applied turquoise as my final highlight. I had fully intended to stick to my monochrome tones of blues, but it felt like the image was missing a contrast. Knowing that yellow makes a great contrast to blue, I decided to incorporate it in small amounts. The yellow I used is called Ivory, and straight from the tube it actually looks like beige. However, once applied next to the blues, it makes the colour appear yellow. I think the painting needed that slight contrast to really make the buildings pop.
I like the simplicity of lines and the colours and think this makes the final painting intriguing. I believe I accomplished my goal of creating interesting textures and compositions with knives, as can be seen from the close-ups.
#2 Wanchai Romance

|

|
This painting is from a photo that I had painted previously in Part 4 with watercolours. It was a photo I took in Wanchai while out for a romantic dinner with my husband. I just liked the composition of the tram and the lights of the buildings almost creating an arrow towards the vanishing point. I wanted to retry the composition using painting knives.
I began with a light purple background. I then used a wash to paint the outlines of the composition. I began working with violet first, to block out the shapes and shadows of the buildings. I had done some colour tests and was first thinking about using orange as the contrast and then working with a middle mix of violet and orange, but this mix turned out to look too much like the purple background, and so I needed to change my original colour composition idea. I placed several little swatches of colour on the outlying are to test what they would look like and decided that I like the contrast created by crimson red and so this was my second layer. I used rose pink to bring out the highlights and lit areas of the image.
To add additional depth and contrast to the painting I mixed a slight purple wash, to bring out some tonal depth in the buildings. Then I added a final contrast colour to bring out the light sources in the image. I tested a couple of different colours to decide on the best contrast. I thought about lime green, as this the complimentary colour of crimson. I also considered orange, to stay within a similar range, but when I tested it next to the other colours, it felt out of place. As yellow is the complimentary colour of purple and lights generally have a yellow glow, I decided to work with medium yellow for the final layer.
I am happy with the final image. It is definitely an improvement on the previous water colour attempt. The lines and perspective in the image draw you in. If I could start over, it might create a background that was not just a solid colour, to help distinguish the different buildings better. But really do like this technique that I'm developing for the urban scapes. It is different and unique.
#3 Wild, Wild Horses
I have always found the elegance and strength of horses fascinating. The lines created by their long faces and soft hair has always been something I wanted to capture in a painting. I found an image of wild horses standing in a filed together that drew my attention. There was a moodiness about the way the grouped together and it felt as though they were consoling each other. This is why I decided to work in blues, as a way to capture that sense of sorrow.
I started with the background using a turquoise and turps wash. I kept the canvas upright allowing the wash to run down. It creates this great crackly texture. I then put down an outline for the horses and worked with various shades of blue to capture the shadows and highlights. I kept it quite impressionistic and loose, as it is hard to create fine exact details with knives.
I'm happy with how it turned out, though I wish had been even more adventurous with the interpretation. the horses look great, and there is a lot of movement and texture created with through the knives, but I think the lines are still too obvious as horses. I think I would have liked to push the abstract element more.
#4 Time To Reflect
After researching Degas and his fascination with ballerinas, I also found myself fascinated. As with the horses, dancers have this unique combination of strength and elegance that form a wonderful contrast. I had already noticed how knives created wonderful textures that are very reminiscent of working with pastels. I spent some time trying to find an image that would really capture the idea of elegance, but also of being vulnerable.
I began with a neutral background to keep the image softer. Next I used a wash of brown, grey and linseed oil, to set out additional outlines and shapes. These wire applied with a thin sponge. I then switched over to the palette knife to start creating textures. I worked with various layers of toned down fleshy colours. I knew I wanted to incorporate a brighter colour to add interest, but also to act as a unconventional highlight. For this I used turquoise.
Once all the paint was dry I used glazes to additional depth and warmth to the painting. I first applied a glaze using burnt sienna mixed with liquin to define and warm areas, particularly the white light reflection. I then mixed dark brown with linseed oil to apply in areas that require additional darker shadows. This also helped to bring a glow to the surface.
I am happy with the final product, I like how the textures and colour choices make it feel like a pastel painting. I like the way I set up the composition, to almost draw out and elongate shadows. As a viewer I think you are drawn in to the ballerina and get a sense of her vulnerability. If I had to pick an area that could be better, I guess that would that the hard lines are not quite as straight or angled as they should be, but then there is also a metaphor within the imperfections of the lines.
Reflecting on Tutor Reports
The tutor remarked on how she could see me progressing in my own thinking and interpretations since Part 1. This is true and encouraging, as I part of the reason why I am studying art is because I am quite new to it and wanted to learn how to express myself. I am fully aware of the fact that this is still a journey and there is still much I want to practice and experiment with. the tutor responded particularly well to an abstract city cape that I did, which is also one I enjoyed creating. She continues to remind that I work better with knives and vague interpretations and should steer clear of working on figures. I think this could be a dangerous blanket statement as I am still learning. She might not be completely satisfied with how I interpret figures, but it is a subject that I still really like and will continue to explore. I think that the watercolour portraits are very soulful and actually some of my favorite pieces. I continue to enjoy growing in my ability to use palette knives and am already thinking about how to include ways of creating better depth or contrasts into my cityscapes.
