In this part of the course you’ll be developing your observational skills both by experimenting with colour and by exploring, through painting, what you see around you close to home – still life. The main focus of this part of the course is on developing your understanding of colour – how colour is perceived and how using coloured pigments creates effects that can help you interpret what you see.
Project: Understanding Colour
Michel Eugene Chevreul (1786-1889)
He was a chemist who was appointed to work in a carpet manufacturing company in 1824. He experienced problems while creating dyes and simply could not get the pigments right.He decided to investigate the matter and did a comprehensive study on how colours are seen, also referred to as 'simultaneous contrast.' The studied contained Chevreul's famous law: Two adjacent colours, when seen by the eye, will appear as dissimilar as possible.
Here is a useful demonstration: http://web.mit.edu/persci/gaz/gaz-teaching/flash/contrast-movie.swf
In order for Chevreul to solve his textile manufacturing dilema, he designed the 72 segment colour wheel. His work demonstrates that a colour will lend its adjacent colour a complementary tinge (of colour hue). As a result, opposing complementary colours will brighten, and non-complementary colours will appear 'contaminated', for example a yellow next to a green receives a violet tinge.

Though his studies were not done for the purpose of art, his work went on to influence many artists. Chevreul’s work influenced the movements in art known as Impressionism, Neo-impressionism and Orphic Cubism.

Impressionism
It is a style of representational art, that doesn't fuss over the finer details. The Impressionists aimed to capture the momentary, sensory effect of a scene. Pure intense colours were included and paintings and an unfinished appearance. One of the most famous artists during the Impressionist movement is certainly Claude Monet. His Vetheuil in the Fog, is considered to be one of his finest works.
What I really appreciate about Monet's work is how 'messy' it is. He really favors using soft lines and colours to make the image feel a bit blurry and almost dreamy. I am amazed at how he has used colour so boldly next to each other without it simply appearing brown. You can actually see the different colours being used and he is very good about creating contrasts that still helps the viewer recognize the subject.

Neo-impressionism
In these paintings, colours were no longer mixed on the palette, but instead applied directly to the canvas in small dots so the viewer's eyes 'mixes the colours when viewing it from a distance. This technique was used by artists such as Geroges Seurat. This is one of his most famous images, A Sunday Afternoon on the Island of La Grande Jatte.
It is amazing how this artist was able to notice how colours blend when viewed from a distance. I imagine how complicated it must be to create a painting with this method, as you need to constantly be stepping away from your work to see the impression you are creating. Seurat must have don many experiments with his colours to familiarize himself with the effects created when apposing different colours.

Orphic Cubism
A short lived but influential style of colourful and abstract art. Robert Delaunay was a well known name during this movement. His work was a great contrast to the original Cubist movement, spearheaded by Picasso and Braque, which tended to be more monochromatic.
In Cubism perspective is abandoned, as space blends into one.
On the left is a painting of the Eiffel Tower by Robert Delaunay.
I quite favor the use of bold colours. They bring a luminosity to the image, making it feel crisp and fresh. As in fashion though, I think one should be careful of using to many bright colours at once. The fashion expression 'pop of colour' could easily be applied in art to help keep paintings interesting and tasteful.
What I appreciate most about Cubism, is that it leaves a lot to the imagination. There always appears to be one recognizable subject or object, but the rest is up for interpretation. I am drawn to the use of shapes and hard lines used in the Eiffel Tower painting. It also takes away the pressures of trying to create a realistic background or setting.
Other artists, like Vincent van Gogh have also made use of the effects of juxtaposing complementary colors.

Yellow and blue accentuate each other in van Gogh’s Café Terrace on the Place du Forum, Arles, 1888.
|

Red and green accentuate each other in van Gogh’s Night Café in Arles, which was painted the same month as the café at left.
|

Denim, 2015, RM, 40x30, oil on canvas
|
Juxtaposing complimentary colours can have a very dramatic and exaggerated effect. I myself have made use of this technique and appreciate how it changes the mood or appearance of the subject you are painting.
In my Denim painting on the left, chose a warm orange and different hues of blue. Not only does this create a great contrast, but the orange brings a warmth and glow to the cool blue tones. |
Exercise: Mixing greys – anachromatic scale
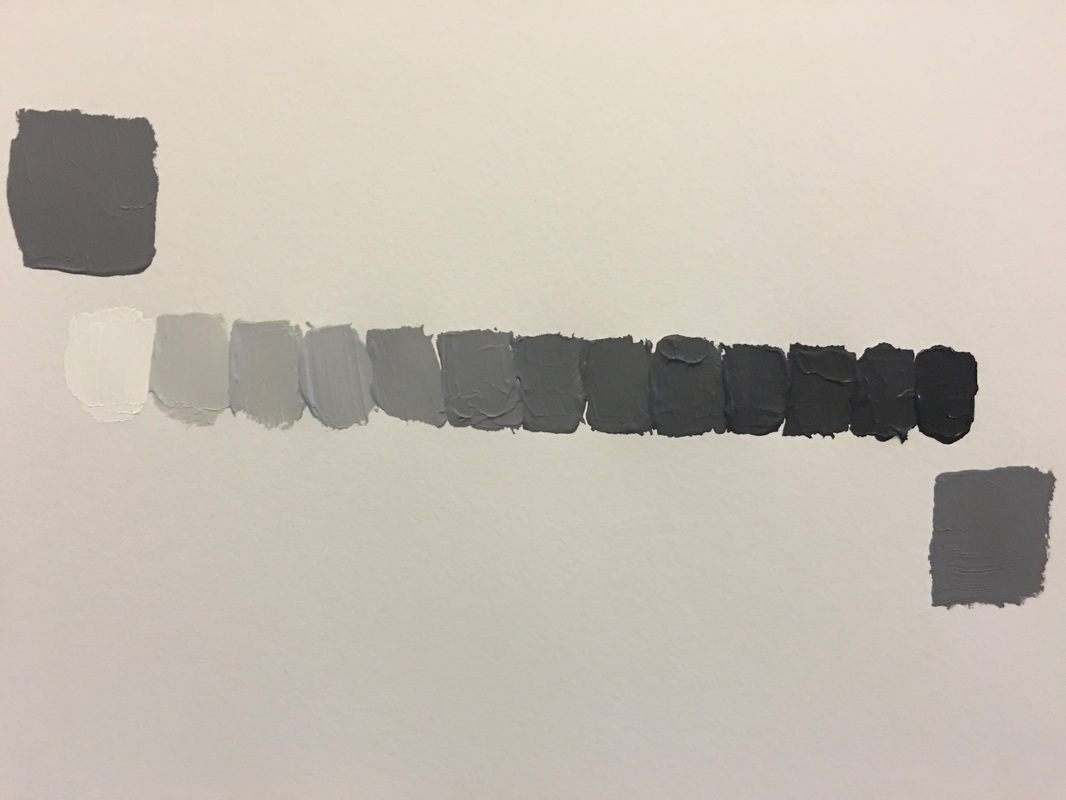
|
You can clearly notice how the grey square at the end where black is, looks lighter than the grey square placed opposite the white square.
Thus darker colours can make other colours appear lighter and vice versa. |
Exercise: Primary and secondary colour mixing
Working on an area of your prepared grey ground, lay all of the yellows next to each other so that they touch but don’t mix.
I also did quite a bit of research about to learn more about the terminology used colour theory. This website was quite useful in explaining the different terms and showing examples:
http://www.tigercolor.com/color-lab/color-theory/color-harmonies.htm
On a grey ground, make a scale from yellow through to red by laying down narrow strips of colour next to each other in a carefully graded sequence. Next, make a scale from yellow to blue, then from red to blue.
http://www.tigercolor.com/color-lab/color-theory/color-harmonies.htm
On a grey ground, make a scale from yellow through to red by laying down narrow strips of colour next to each other in a carefully graded sequence. Next, make a scale from yellow to blue, then from red to blue.
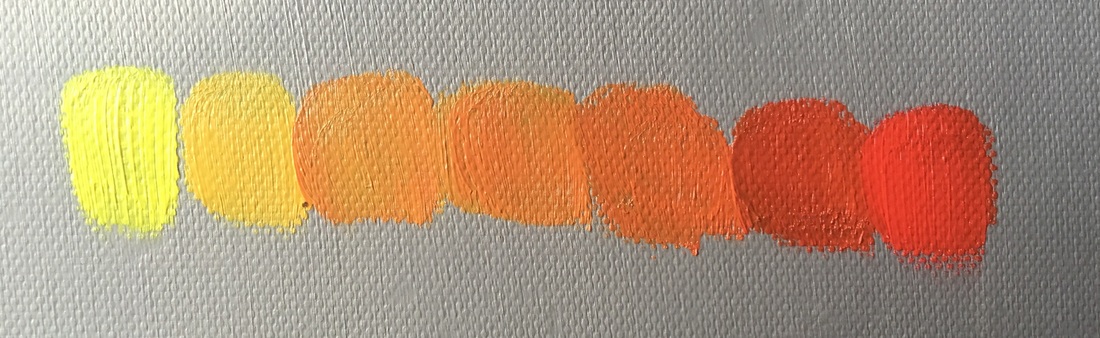
Scale from Lemon Yellow to Brilliant Red

Scale from Lemon Yellow to Paitho Blue.
My scale from yellow to red was not quite that successful. I mixed in too much red by my third mixture. When mixing the yellow with blue, I made sure to use very small amounts at a time. One thin you can notice when creating tertiary colours, is that they tend to be a bit more murky.
Exercise: Broken or tertiary colours
Now make a scale between two tertiary colours and write down your observations.

Scale from Orange to Violet
I was quite intrigued by the result of this mix. I started with orange (Vivid Red) and mixed in a bit of whit first. I then gradually added Violet. The fleshy colour that it created in the first 3 tones surprised me. these colours have a very pastel and soft feel about them. I imagine this is because of the addition of the white. The gradient feels as though it is moving from warm to cool.
Exercise: Complementary colours
Complementary colours are at opposite sides of the colour spectrum. One way to learn about locating and mixing these colours is to make your own colour wheel. Try to mix the colours from Chevreul’s colour circle or wheel beginning with primary red, red-orange, orange, orange-yellow, yellow and so on.

In this example I tried to create more hues inbetween, but I miscalculated. I should have had more shades in between violet and green. It was difficult creating violet as it comes out quite brown. I ended up adding lighter shades of blue and violet to get the colour.
|

For this wheel I chose to use only the tree Primary colours and mix them from one scale to the next. This is why the hues from red to blue appear to look more brown.
|
Make mixtures of each pair of complementary colours. Make a note of the colours mixed and describe the resulting colour. This is another way of creating broken or tertiary colours.
Look closely at the effect that complementary colours have on each other and try to explain this in your notes.
Look closely at the effect that complementary colours have on each other and try to explain this in your notes.
The mixtures of all these colours are mostly earth tones or variations on brown. They all look quite muddy, which is surprising when you look at how bright the red, yellow and orange are. This could be because I mixed the colours in equal proportions. It may have different outcomes if I used more or less of each.
Project: Still Life
Drawing is an essential element in painting. The emphasis so far in this part of the course has been on colour. The aim of this project is to develop your graphic and interpretive skills by bringing the discipline of observational drawing into painting.
The Dutch Golden Age of painting coincided with a period of stability and wealth in the newly independent Dutch Republic. The development of still life as a subject for painting arose through a shift away from classical and religious subject matter to genres more suitable for the homes of the newly wealthy merchant classes. One of these genres was the still life. The Dutch masters used still life as a way to explore the technical and artistic possibilities of applying paint.
The Dutch Golden Age of painting coincided with a period of stability and wealth in the newly independent Dutch Republic. The development of still life as a subject for painting arose through a shift away from classical and religious subject matter to genres more suitable for the homes of the newly wealthy merchant classes. One of these genres was the still life. The Dutch masters used still life as a way to explore the technical and artistic possibilities of applying paint.
Research Points
1. Look at the work of some of the 17th century Dutch still life and flower painters.
Some of the most important painters of the time include:
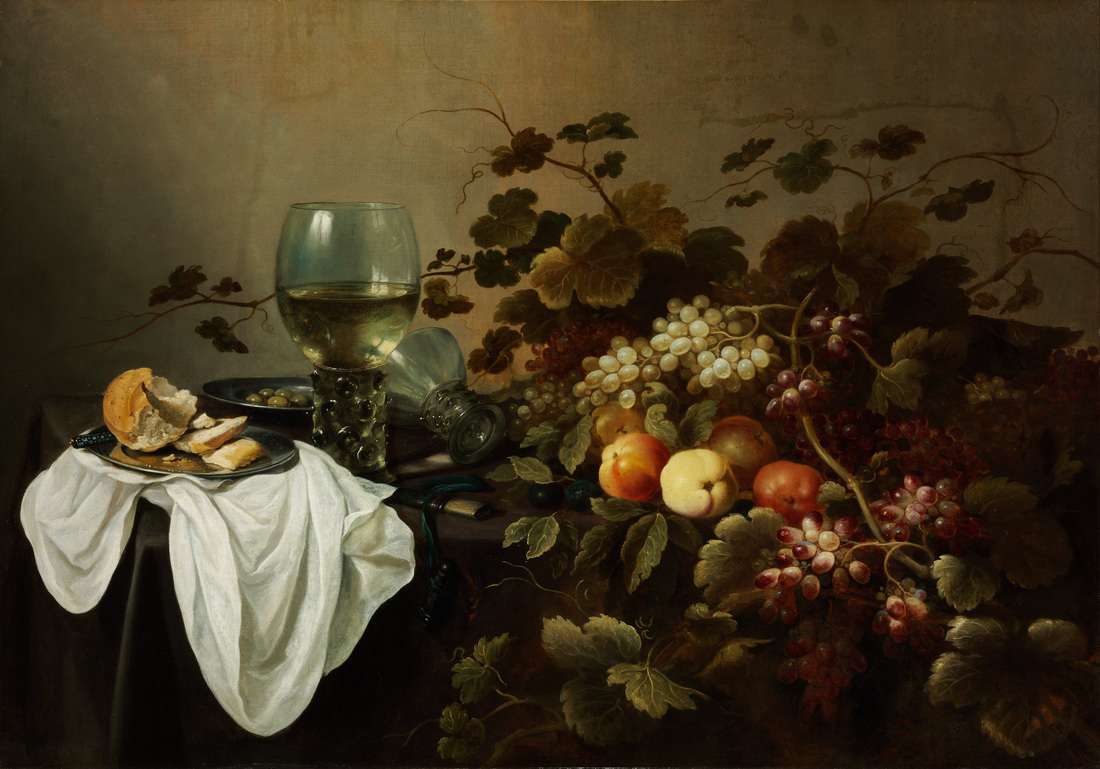
1. Pieter Claesz
He was considered a master of breakfast piece still life. He painted with a more monochromatic palette, using earth tones. He used subtle light and texture to create expression. Claesz generally chose objects of a more homely kind, although his later work became more colourful and decorative. In some of his works we see the use of flowers and fruits, like the examples below. Even though he has used a lot of different colours he has kept them with similar tonal values. The images feel warm and almost monochrome.
Some of the most important painters of the time include:
1. Pieter Claesz
He was considered a master of breakfast piece still life. He painted with a more monochromatic palette, using earth tones. He used subtle light and texture to create expression. Claesz generally chose objects of a more homely kind, although his later work became more colourful and decorative. In some of his works we see the use of flowers and fruits, like the examples below. Even though he has used a lot of different colours he has kept them with similar tonal values. The images feel warm and almost monochrome.

|
|
I 2. Frans Hals
He was the early master of portraiture, painting group portraits and individuals for the affluent classes.. He painted with loose brushwork and a very lively style. He really seems to capture the spirit of his subject through his use of facial expressions. I particularly like the monochrome effect in the portrait on the right. It really helps to bring our shadows and highlights.
He was the early master of portraiture, painting group portraits and individuals for the affluent classes.. He painted with loose brushwork and a very lively style. He really seems to capture the spirit of his subject through his use of facial expressions. I particularly like the monochrome effect in the portrait on the right. It really helps to bring our shadows and highlights.

|

|
3. Rembrandt van Rijn
He became the greatest portrait artist in the world in the middle of the Dutch Golden Age. He was also a print maker and painting many religious paintings. As can be seen by the paintings below, there is a real sincerity to his work. He captures his subjects humbly and honestly. I particularly like that he chose and unconventional positioning for the portrait. The close up on what is happening makes it even more shocking and interesting.
He became the greatest portrait artist in the world in the middle of the Dutch Golden Age. He was also a print maker and painting many religious paintings. As can be seen by the paintings below, there is a real sincerity to his work. He captures his subjects humbly and honestly. I particularly like that he chose and unconventional positioning for the portrait. The close up on what is happening makes it even more shocking and interesting.

|

Details of the blinding of Samson
|
4. Jan Steen
He became known for his tavern paintings and genre paintings showing cheerful people having fun. He also painted portraits, as well as historical scenes. Biographers described him as a painter with little restraint. From the images below you can see that a lot of detail and energy went into his paintings. His work evokes a feeling of being part of the scene. The chaos in the image helps you to sense the atmosphere and you almost feel as though you can hear the chatter, music and cheer that would be taking place.
He became known for his tavern paintings and genre paintings showing cheerful people having fun. He also painted portraits, as well as historical scenes. Biographers described him as a painter with little restraint. From the images below you can see that a lot of detail and energy went into his paintings. His work evokes a feeling of being part of the scene. The chaos in the image helps you to sense the atmosphere and you almost feel as though you can hear the chatter, music and cheer that would be taking place.

|

|
5. Pieter de Hooch
He is best known for his interior scenes and use of light. He preferred painting middle class families immersed in their daily activities. There was always a source of brilliant light radiating into his images. From the images below we can see that his compositions were quite intricate and intimate. I find it interesting that the architecture in the images take up so much of the subject.
He is best known for his interior scenes and use of light. He preferred painting middle class families immersed in their daily activities. There was always a source of brilliant light radiating into his images. From the images below we can see that his compositions were quite intricate and intimate. I find it interesting that the architecture in the images take up so much of the subject.

|
|
6. Johannes Vermeer
He is mostly known for his specialist interior paintings of the middle class. He worked slowly and meticulously on his paintings and favored using light and expensive pigments in his work.
He is mostly known for his specialist interior paintings of the middle class. He worked slowly and meticulously on his paintings and favored using light and expensive pigments in his work.

|

|
7. Rachel Ruysch
She is known for paintings of flowers late in the period and is very important as one of the few female painters to become known for her work during this period. She sketched and painted very meticulously, using fine painstaking brushwork. She also enjoyed using vibrant colours and playful compositions. He uses vibrant and crisp colours in his images, which create a great contrast.
She is known for paintings of flowers late in the period and is very important as one of the few female painters to become known for her work during this period. She sketched and painted very meticulously, using fine painstaking brushwork. She also enjoyed using vibrant colours and playful compositions. He uses vibrant and crisp colours in his images, which create a great contrast.

|

|
Make notes on paintings that you especially admire and find out more about the techniques that were employed at that time.
I particularly like the portraits of Frans Hals. He is a Baroque artist who captures the status and essence of individuals by manipulating the atmosphere and composition. He would let individuals sit with particular gestures or dress to help portray their status or character. He favored working with vivid light which made his paintings sheen with clarity. He became very popular because of his ability to define character. He used warm tones mainly for his subjects' flushed faces and his various multi-layering techniques. Hals would use vivid brush strokes, soft ochres and broad lines of pastille colors to show light breaking in upon texture. He made use of multiple tones to create a sense of movement and atmosphere. Daubing (to smear or spread) is dominant in all of Hal's works as he uses not one smooth color to define objects and surfaces but rather a multitude of tones, creating a fresh approach to realist painting.
2. Research at least one painting that has iconographic significance. Which of the objects depicted carry particular meaning and what was that meaning?
Iconography, as a branch of art history, studies the identification, description, and the interpretation of the content of images: the subjects depicted, the particular compositions and details used to do so, and other elements that are distinct from artistic style.
Rembrandt van Rijn

3. Explore the development of still life through the eighteenth, nineteenth and twentieth centuries. For example, look at how traditional still life subjects were dealt with in some early Cubist paintings by Braque and Picasso. Investigate how some contemporary artists are interpreting this genre.
At first, still-life painting was just used as a manner of practice. Artists would build their techniques and skills by painting an array of natural and man-made objects.The term derives from the 17th-century Dutch still-leven, meaning a motionless natural object or objects. The popularity of the still-life grew during the time of the Renaissance. At first artists created portraits of affluent individuals and started including man made and natural objects in order to depict their status or character. These objects soon started taking over more of the images, as the artists grew in their skills of representing objects, they soon became the focal points. Paintings of flowers were quite popular in the Netherlands, with artists like Jan Breughel and Rachel Ruysch creating some of the greater flower paintings at that time. Still lifes of game was also popular, particularly among the Spanish community.
At first, still-life painting was just used as a manner of practice. Artists would build their techniques and skills by painting an array of natural and man-made objects.The term derives from the 17th-century Dutch still-leven, meaning a motionless natural object or objects. The popularity of the still-life grew during the time of the Renaissance. At first artists created portraits of affluent individuals and started including man made and natural objects in order to depict their status or character. These objects soon started taking over more of the images, as the artists grew in their skills of representing objects, they soon became the focal points. Paintings of flowers were quite popular in the Netherlands, with artists like Jan Breughel and Rachel Ruysch creating some of the greater flower paintings at that time. Still lifes of game was also popular, particularly among the Spanish community.

|

|

|
During the 18th century the popularity of the still life continued to grow. The Rococo movement brought with it a new infatuation for illusion and trickery. Cubist artists like Braque and Picasso particularly lead the way.
Braque had the wonderful ability to simplify an image down to lines colours and shapes. Particularly manipulating the viewers eye regarding perspective and space, as he depicted objects on a single plain.
Braque had the wonderful ability to simplify an image down to lines colours and shapes. Particularly manipulating the viewers eye regarding perspective and space, as he depicted objects on a single plain.
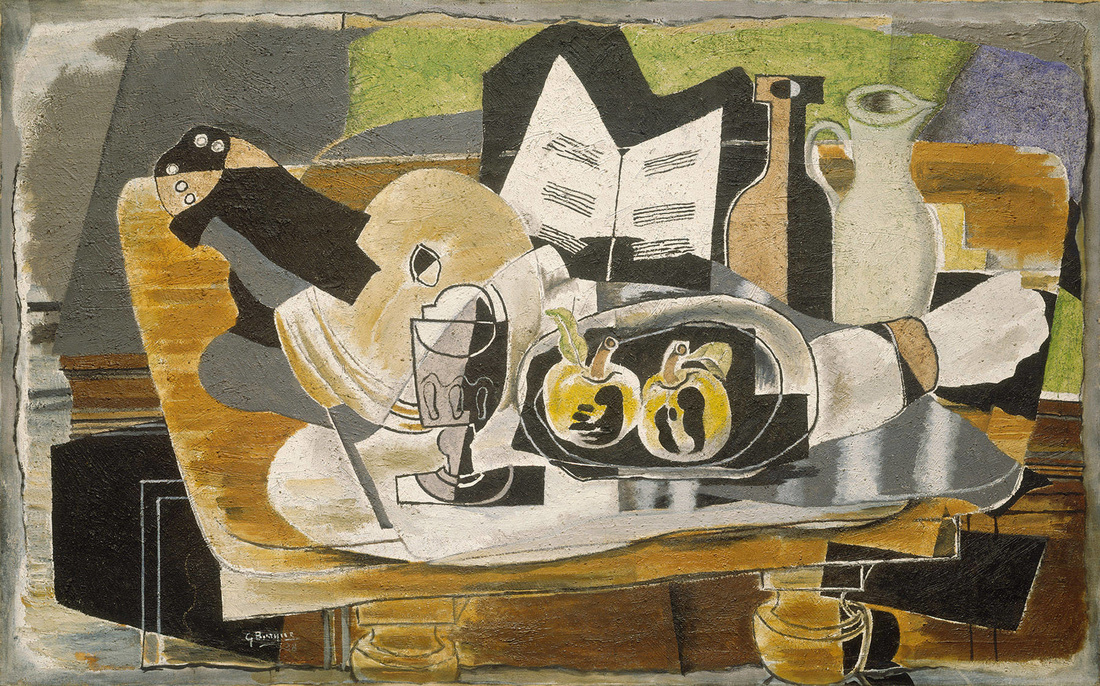
The Table, Braque
|

Nature Morte, Braque
|
During the 19th Century the Academic Hierarchy of paintings declined which meant that still lifes and landscapes could finally be seen in their own right. As their popularity grew, so did the skill and techniques used. Paul Cezanne created woderful works of impressionism, while Henri Fantin Latour created playful and realistic flower bouquets.

Basket of apples, Paul Cezanne
|

Flowers and fruit, Henri Fantin Latour
|
The Fauvist approach for vibrant colour swept in during the late 19th and early 20th century and it was clear that freedom and exploration was guiding artists to try new ways. Matisse was an artist during this time whose avant-garde methods aroused considerable controversy, yet today his innovative impressionistic use of colour makes him one of the most influential artists of our time. Van Gogh also made quite a splash during this time. His animated and gestural way of painting excited the art world.

Matisse
|

Van Gogh
|
Also very popular during the 20th century was cubist inspired artist Pablo Picasso. He is considered to be one of the most influential artist of our time. Though his work is mostly considered cubist and abstract modern art, he gained much of his influence from 19th century art, particularly romanticism and expressionism. The romantic movment was now for its value of science, reason and enlightenment. Expressionism is when an artist puts his own interpretations of a subject onto the canvas. They often sacrifice realism and accuracy in favour of colour, line and feeling.

Weeping woman, Picasso
|

Three musicians, Picasso
|
|
You cannot look at the evolution of the still life without acknowledging still life photography. Cleverly composed objects, with vibrant lighting and artistic appeal are at the forefront of advertising food and products. Many artists have also grown successful in the field of photography and are artists in their own right.
I quite like it when they try to create images that are a bit more exciting and pushing photographic techniques. Like the image on the right, where all the objects appear to be moving. |

|

|
Also popular at the moment are extremely realistic sketches. the angles, tones and lines are so perfect they make the object appear real. The glass of water on the left looks real enough to pick up.
I appreciate the time and effort that must go into creating this kind of optical illusion. You can watch a video of how one of these are created here. |
Exercise: Still life with flowers
Begin by working in your sketchbook on simple drawings that help you to decide:
• the format you’ll work in – portrait, landscape or square
• basic composition
• tonal values in relation to the light source
• your range of colours (make notes on this and name colours in your drawing)
• scale.
• the format you’ll work in – portrait, landscape or square
• basic composition
• tonal values in relation to the light source
• your range of colours (make notes on this and name colours in your drawing)
• scale.
Make extensive notes about the decisions that you made, your working methods, the time that you spent and your thoughts about the completed work.
In preparation for drawing and painting flowers, I looked up work from other artists to gain further insights. I also watched a couple of videos to help give me a sense of how to begin. I am subscribed to the Artist Daily magazine and regularly receive emails about their latest courses. The often create short videos that just show you the highlights of the course. Though I'm not enrolled for any courses, I have found these short videos to still be a great tool for getting ideas and often tips and techniques inspiration. I came across this video by Stephanie Bidsall, which you can view here. What I took from this was the following:
1. Your composition doesn't have to look like the bouquet, you should look for the shapes and colours that draw you in.
2. You are the artist, you get to manipulate placement. Let the space and colours guide you as you start painting.
3. View items as shapes and it makes it easier to fill spaces and create definition.
Setting up the still life
I decided to use fake flowers, as I new creating the sketches and then painting would take long, and I didn't want them to change during this process. When purchasing the flowers, I was already looking at shapes and colours to decide my composition. I tried to keep the colours within the similar warm tones, as I didn't want there to be a stark contrast. I tried to chose flowers that will create interesting lines and details and would hopefully compliment the composition.
I cut down an shaped the stem until I was happy with the dimensions. I kept moving around the different stems, stepping back, viewing, and making changes again if needed. Once I was happy with the overall placement of colours and shapes, I used tape to keep the flowers in that position.
Sketching with graphite
I created the A4 sketch with a 2B pencil. During this first sketch, I wasn't too concerned with exact proportions and scale. It was more important for me to capture then highlights and shadows of the different flowers an leaves. I also noticed that there were many leaves in the composition, which I felt made the overall look to busy and so I didn't include all of them. I started blocking out the relevant shapes and lines that I wanted to use. I first blocked out the pot and the use that as the scale for where everything else would go.Once all the flowers were roughly blocked out, I looked at the composition and where I noticed big gaps, I decided to insert leaves.
The problem with working with the fake flowers is that they don't reflect or absorb light quite as well as the real thing. Especially the leaves appeared quite dull. I had to look at images of flowers and leaves to help me gain insight of where the tonal differences might occur. One of the things I noticed, is that the shadows tend to fall on the insides of petals. The very tip of a petal or leaf, tends to have a crisp highlight on it. The different petals capture light differently within their curves and can be unique to each flower depending on their curves.
When sketching I tend to always follow the following method:
1. Block out image and create soft outlines
2. Look at composition, scale or representation and make adjustments if needed,
3. Soft shading to fill the sketch wit all the relevant objects.
4. Layering and adding additional shades. I continue this step until I start seeing a more 3D appearance.
5. Use an eraser to put back highlights
Sketching with color pencils
I created an A3 sketch with colour pencils, as I haven't really worked with them much and wanted to experience how it works. This time, I printed out the photo I took of the flowers and printed it in A3 size. I covered the image with grid lines (rectangular and diagonal) and did the same om my blank paper. I used these line to help guide my on the placement of my flowers. Again, I first created a soft outline of the flowers and then decided where to place the leaves. I chose a softer colour from each colour range in the scene to fill in a base colour. I then used varied colours within that tone range to add depth and shadow to the item. For example, to create the peach rose, I used flesh tone, orange, light pink, dark pink, grey and light brown. Working with colour pencils is quite time consuming and to get the actual colours that you want you have to do a lot of layering. I decided to only do one of each different flower and a leaf to experiment with how to blend colours. I did not complete the sketch.
Watercolour painting
I painted the final composition on A3 with watercolour paints. I started in a similar way to all the sketches. I transferred the outlines starting with flowers first, then added the leaves until I was happy with how the items filled the space. Here is a breakdown of how I painted the various items:
Pot - black and yellow, very diluted
Peach flower - red, yellow and white, very diluted
Pink flower - red and white, highly diluted
Cream rose - red, yellow and white, extremely diluted
Leaves - Combinations of light and dark green
I first put down a soft base colour of all items, then went back and added additional layers to intensify colour. I used white and brown to build on tone variations.
Final thoughts
I was very happy with my pencil sketch and felt that I captures the shados quite well. These can be hard to detect when you are working with something that is quite colourful, so you really have to look at the object for a long time to notice where the subtle differences are that created shading.
The colour pencil sketch was interesting, but very complicated. It takes very long to layer the colours to crate the actual shade you want, and if you start to dark, you can't really correct it. Regardless of that, I do think I got quite close to the colours from the image.
The watercolour turned out fine. It is not quite what I expected, but I think this is because I don't have the correct paper. It would be better to have paper that bleeds more, so you can get the soft edges, which are more ideal for painting flowers. I still feel pleased with the composition and placement of all the items. For me it was mostly important to get some accuracy when representing the colours, which is very close. I am happy with the shapes and lines created and it has some 3D element to it. There is no doubt is could be better, but for as an exercise it was successful in helping me experiment with different ideas and try mediums that I don't work with all the time.
Trying different flower techniques
|
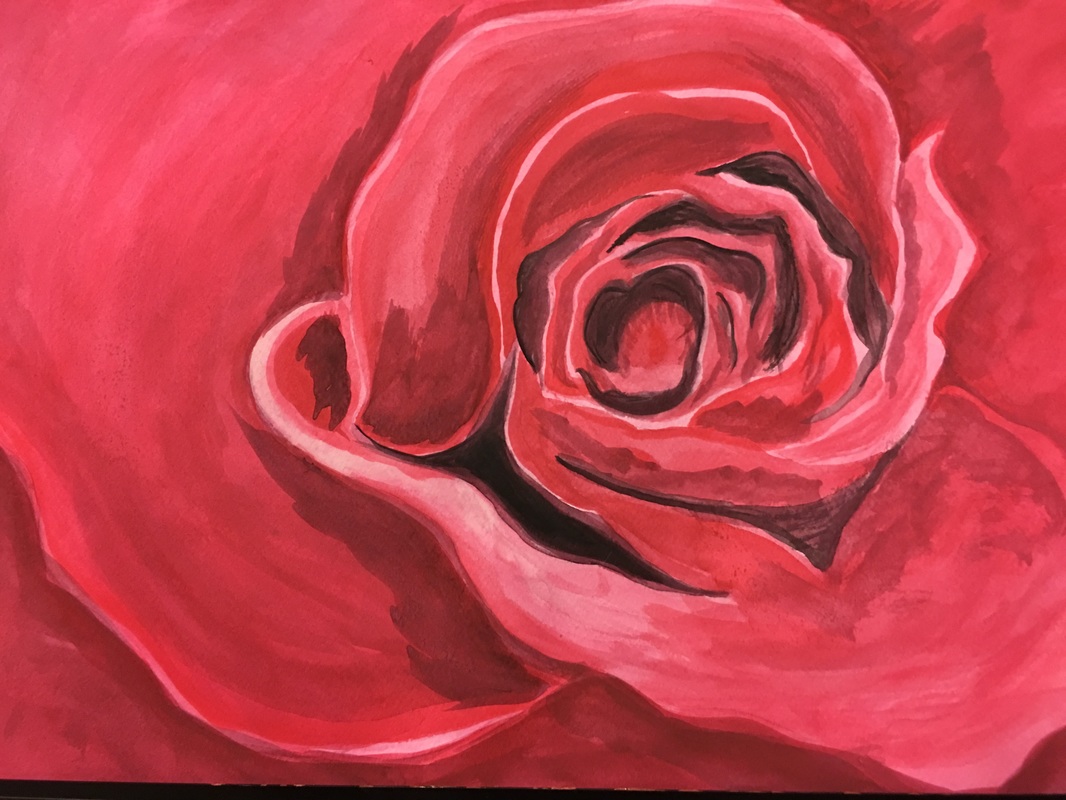
After viewing a short video on the Artist Network of Birgit O’Connor and how she paints flowers with water colour, I wanted to try it our for myself. The video can be viewed here. These are some of the points I found interesting:
1. Simplify and eliminate, take away what you don’t want 2. She filled the negative spaces (background first, then painted from the center of the flower outwards. 3. The images are quite close up to the flower, making it the real focal point and also creating interesting lines and shapes. I think it would have turned out better in oil, but as this was an experiment it still helped me to recognize tonal values, the placement of highlights and shadow as well as the placement of shapes and lines. |
Additional Sketches
While I was on school trip in Malaysia I tried to work in some sketching practice. Unfortunately I didn't have much free time, so the two sketches I did were quite rough and unfinished. This was still good practice for me as I had to consider scale, shape, lines and definition.

Sail boat moored in the distance
|

Palm tree
|
Exercise: Still life with natural objects
Drawing in preparation for painting can often help to solve formal problems that are harder to solve with the fluid medium of colour.
Assemble a group of natural objects. These could be highly-coloured objects such as fruit or vegetables (peppers make an excellent subject), more subtly coloured vegetables or highly structured objects that are almost monochrome such as shells, skulls, rock crystals or seed heads.
Study your still life and notice the important linear aspects of what you see. Look at the hard lines and angles of the table, window ledge or wall. Notice the flowing lines of a draped fabric, if there is one. Look at how the outlines of objects and the spaces between them create particular relationships of line. Identify lines that define tonal areas.\
You may wish to work on small coloured studies first using coloured pencils, oil pastels or watercolours. Once again, decide on your format, scale, composition, light source and colour palette. Make notes as you go along.
Assess your finished painting carefully. Make notes in your learning log on:
• how you’ve progressed from your first attempt at still life
For this painting, I think I was a bit more adventurous with the background and I'm quite pleased with how it turned out. I have become a lot more attentive at the scale of objects compared to others. Noticing natural shadows and highlights on objects also feels easier. I also experimented painting the objects with a palette knife. It was good to push myself with this, as the knifes are more difficult to control. Though I think if I work with them again, I would work with larger objects.
• any problems that the natural objects presented
The feel quite white with the background, so it might have been good to mix in some of the browns used in the cloth and background to create more of a cohesion. I found it quite hard to create an accurate colour for the cloth. It turned out much darker then it should have, but I simply couldn't get it right.
• your choices, working methods and finished painting
I moved the objects around quite a bit, turning their angles and changing their heights until I was happy with the composition. For the colour study I wanted to experiment with pastels. Seeing as I don't work with these often, I'm actually quite happy with how that turned out. The colour of the cloth turned out more accurate with the pastels than with the oils. I decided to use acrylics for the background as it would dry faster. I used a big brush and sponge to create a more interesting colour and slightly textured appearance. I first layered out the white objects with a mixture of turps and mixing white, so I could have accurate placements and lines for them. I then proceeded to mix a couple of different tones of white, which I then applied with a small palette knife. I used the same method for the cloth and decided not to focus to much on the draping details, but rather the direction of the strokes. As mentioned before, I think this would have been easier if the objects were bigger, as I struggled to work in between items. I also wonder whether it would have been easier, if I were painting objects that weren't rounded.
Exercise: Still life with man-made objects
When you’ve completed your still life, look at it carefully and comment on the following:
• your planning and working methods
When setting up the objects, I moved items around many times. Every time I move an object, I step back to see how the lines form or whether it is creating an overall view that is interesting. Once I was happy with where the various tools were, I took several photographs from different lower to higher angles to find the one that created the best contrast for the objects.
• your choice of format/scale
I pretty much wanted it to be on a scale of 1:1, which it roughly is. As the exercise was about recognizing colours and tonal accuracy, I wanted the image to appear a realistic as possible.
• the composition
I have seen many paintings of artist tools before, there is a sense of poetry in celebrating the tools to that help to produce the art. I was keen to create my own version of this. As I had many brushes and tools, it took a lot of swapping in and out to find ones that appear to compliment each other. As this was more for practice I didn't create a full completed image with surface or background. This is something I could always go back and do, although I don't mind the plain background either.
• colour interest and tonal contrast
I kept them within a similar coulour range which I think creates a harmony in the image. You can see my range of colours in image 5. Grey and yellow ochre formed the base of most of what I was painting, aside for the black container. I then used continued to build additional layers, starting with the shadows first and ending with the highlights. Painting the black container was interesting, as it was reflecting greens and browns from the room around me. I used an emerald green in the reflections and then created a black wash with turps to tone that down
• your paint handling
As this image is not that large and the tools are quite narrow, I had to use two thin tip brushes to paint most of it. This meant a fair amount of slow and meticulous work. I chose not to thin any of the paints I was working with, and instead used layering. I observed the tonal differences and either used dark brown or black to create the darker tones and white to create lighter tones. I would premix a tonal palette range for a particular object before starting to paint it. Fortunately there were quite a few parts that required a silver look, so once I had created a range of greys I could do all this surfaces quite easily.
Overall reflection of three still lifes
Sketching and painting a variety of objects in various compositions is a good way to refine your observational skills. Even when I'm out and about now, I look differently at things, I'm always trying to see if I can spot the darkest and lightest spots within a subject.
Colour matching can be quite difficult. I often add to much of a certain colour and take the tone to far. Sometimes it is better to start your colour mixing over, than trying to fix it. The colours of objects also appear differently on photographs which is something to consider.
Composition is another interesting factor when painting still lifes. Sometimes composition can come down to taste, so people may differ on their opinions of what is a good composition. I think the most important thing to learn here, as that as the artist you are in control. You don't necessarily have to draw things exactly as they appear. You should be editing, manipulating and changing what you feel will enhance the final product.
Affordable Art Fair
This fair has become an institution in Hong Kong. It is a great opportunity to see a great variety of art in one space. Many of these artists are up and coming, so seeing their work is quite inspiring and there are some great ideas. There were also interactive art stations and demonstrations which add to the experience. I mostly photographed work that covered subjects or techniques that I'm interested in. You will notice that I'm drawn to human subjects, but also took many close-ups of techniques that were using mixed media, textures and interesting colour techniques. As an artist I would love to push myself to experiment more with these techniques and not be worried about making mistakes.
Project Colour relationships
In this project, you’ll return to the theme of colour relationships. As you’ve seen, colours are not fixed: the appearance of a hue constantly changes according to the light and its juxtaposition with other colours.
Simultaneous contrast is where a colour appears to change when seen against a different background.
Successive contrast refers to the fact that when you view a particular colour, you get an afterimage of its complementary colour. This optical effect lends greater intensity to both of the complementary colours present.
When two perfectly chosen complementary colours are placed side by side, they each appear more vivid and intense and a vibrating boundary between them creates a sensation of movement. These effects can be exploited to great effect in both abstract and representational painting.
Exercise: Exploring contrasts
|
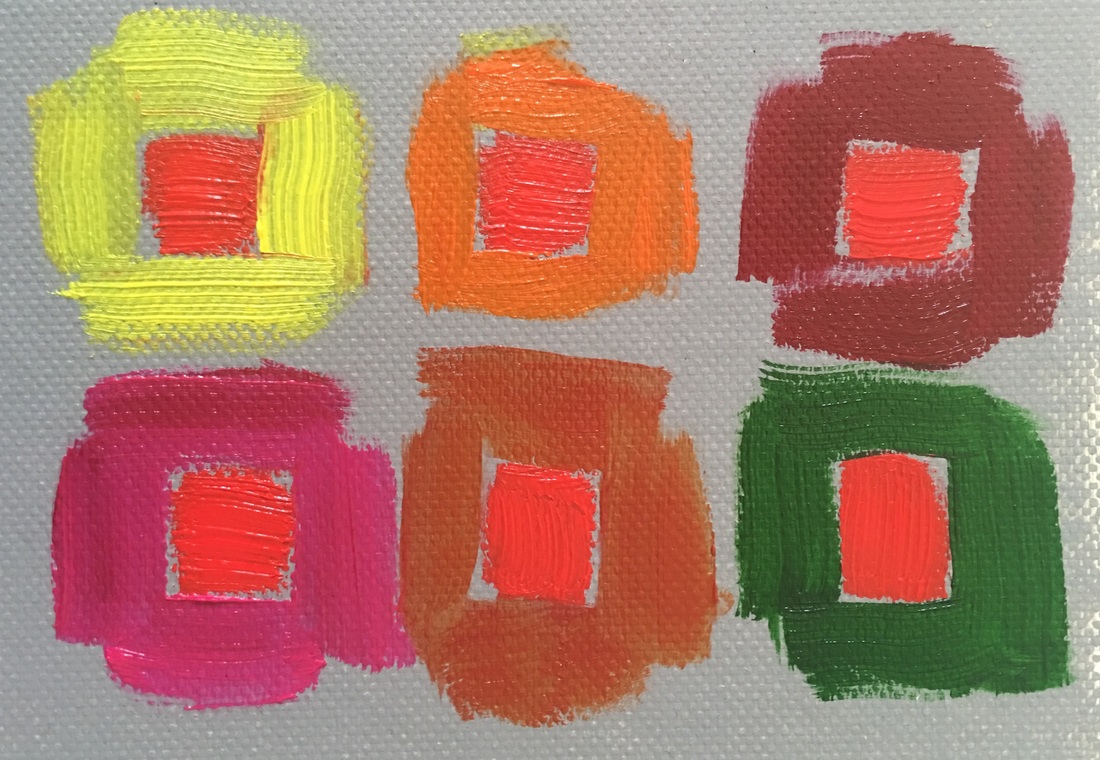
Choose any colour you like (colour A). Now mix a series of several colours that are close in the spectrum to colour A. Paint a series of small squares of colour A, surrounding it each time with one of the colours you’ve mixed.
Now paint around this colour with a larger square of this colour’s complementary made equal tonally by the addition of white. What do you notice? You can certainly see that the Green is Red's complimentary colour, as it clearly enhances the colour. |

I continued to use Brilliant Red and Sap Green for this exercise. When the green is in the center, it appears much darker whit the red than the white. When the neutral grey is in the center it appears at its lightest with the green, almost making it look more white.
|
Working either with the same or a different pair of complementary colours, paint a square frame in each colour side by side, leaving a square gap in the middle of each. Now paint a similar square frame of white underneath, again leaving a square gap in the middle. Mix a neutral grey or beige colour and fill each of the central squares with this colour. Take care not to let the colour in the center mix with the surrounding colour. Notice how the appearance of your neutral colour alters.
Make notes about the colours you’ve mixed and their effects on each other. |
Research Point
Optical effects have been exploited by many artists to create movement and depict the effects of light. The Impressionists, Post-Impressionists and Neo-Impressionists – in particular the Pointillists, Seurat and Signac – made full use of the
new understanding of the nature of human perception. Find out what you can about these artists’ aims and study their pictures to see how they achieved effects such as optical mixing. Look also at the work of Bridget Riley or the Op artists.
new understanding of the nature of human perception. Find out what you can about these artists’ aims and study their pictures to see how they achieved effects such as optical mixing. Look also at the work of Bridget Riley or the Op artists.
Georges Seurat


He was an icon during the 1900s and the initiator of Neo-impressionism. His trade mark method is now known as the Pointillist method of painting. The artist uses small dot-like strokes of color, and when viewed the eye mixes them to create the full image. He was particularly fascinated by colour contrasts and harmony. He realized that his method of painting vibrant coloured dots, created a more luminous colour effect when viewed side by side. He favored painting urban scenes and painted objects and figures by simplifying their forms and limiting their details. His experimental brushwork and color combinations kept the scenes vivid and engaging still making the figures appear significant.
A clockwork Sunday is definitely one of his most famous works. I quite like the composition of the painting and how the the artists has created the figures more like silhouettes. He has kept his coulour palette quite true to the scene and they mostly feel to have a cool tone. You really need to look quite long and hard to notice that the colours are not blended but applied with points, as it was done very skilfully. He creates a great harmony and I can appreciate the time and thought it must take to produce.
A clockwork Sunday is definitely one of his most famous works. I quite like the composition of the painting and how the the artists has created the figures more like silhouettes. He has kept his coulour palette quite true to the scene and they mostly feel to have a cool tone. You really need to look quite long and hard to notice that the colours are not blended but applied with points, as it was done very skilfully. He creates a great harmony and I can appreciate the time and thought it must take to produce.
Paul Signac


Signac was inspired and driven by Impressionism. He also worked with Seurat to refine a painting style that used optical effects and shared his interest in color and perception. He used the same Pointellist techniques as Seurat and enjoyed painting landscapes and urban scenes, though we can clearly see that he was not afraid to use vibrant and sharp colours.
Signac's work feels a bit more fantastical or mythical than Seurat's work. He uses bright colour contrasts that are not necessarily accurate to the image. His 'dots' are also much larger and more obvious in his work, so you are acutely aware of the paint not being blended. This is very different from Seurat's work, who as I mentioned before created a great harmony in his images. These colours and compositions feel more like an explosion and is everything but subtle.
Signac's work feels a bit more fantastical or mythical than Seurat's work. He uses bright colour contrasts that are not necessarily accurate to the image. His 'dots' are also much larger and more obvious in his work, so you are acutely aware of the paint not being blended. This is very different from Seurat's work, who as I mentioned before created a great harmony in his images. These colours and compositions feel more like an explosion and is everything but subtle.
Bridget Riley


Bridget evolved a style in which she explored the dynamic potentialities of optical phenomena. Her works engage the viewers' perception to induce simultaneously shifting patterns of forms and colors. These types of art grew in popularity during the 60s and were referred to as Op-art. The basis of the Op Art movement was a form of geometric abstraction, which was in a way impersonal and not obviously related to the real world. The combinations of shapes and colours produces a disorienting physical effect on the eye.
One can immediately tell this this art is from the 60s, so it is very reminiscent of that era. These patterns were popular on accessories, clothing and furniture. I certainly appreciate the science behind these kind of optical creations. They are fun and intriguing. Not necessarily the kind of thing that I would hang in my living room, but I like that it is both simple and complex at the same time.
One can immediately tell this this art is from the 60s, so it is very reminiscent of that era. These patterns were popular on accessories, clothing and furniture. I certainly appreciate the science behind these kind of optical creations. They are fun and intriguing. Not necessarily the kind of thing that I would hang in my living room, but I like that it is both simple and complex at the same time.
Exercise: Still life with complementary colours
Choose just two hues, one colour and its complementary and use white to lighten tone. You can mix the complementary colours to create a range of broken colours. You could work towards a monochrome effect by losing the high chroma of the unmixed colours through mixing towards the greys and black that they can create together. Alternatively, you could
exploit the juxtaposition of these colours in their brightest unmixed form. Remember that to create the strongest effect you should lift the tone of the darkest hue to match the lighter colour. Use the full tonal range of each colour to provide tonal interest or make deeper tones from mixing the colours together.
exploit the juxtaposition of these colours in their brightest unmixed form. Remember that to create the strongest effect you should lift the tone of the darkest hue to match the lighter colour. Use the full tonal range of each colour to provide tonal interest or make deeper tones from mixing the colours together.
For this exercise I decided to use blue and yellow. It took a while to find the objects that thought would create a good contrast. After a trip to Ikea, moving around several items and staring at them for what felt like days, I finally collected a couple of blue objects I thought would work well together. I liked the idea of the blues being different. As always, I moved the objects around several times until I was happy with the composition. I took photographs from several angles to fined on I was happy with. As the lemons would be the only yellow object,
I decided to incorporate yellow into the background. I created a soft yellow background, which I was intending to keep, but once I had painted all the objects, I felt like the background was boring, so I went back and added ad brighter yellow and use a dark blue wash. Unfortunately I was impatient and didn't wait to apply my glaze once the yellow was dry, so it did blend forming green. though I had intended this to be more specifically yellow and blue, I don't mind the hint of green created, as it does add to the mood of the composition. My biggest fear has been to paint something in glass, so I decided to face those fears in this piece. I'm happy with my first attempt and it wasn't nearly as hard as I thought it would be. The exercises we did in Part 1 by creating colour washes, was really useful and helping me create more transparent colours. This made it much easier for me to use the combinations of my blue palette with green and turps and order to create a transparent glass effect. Of course, I can keep improving.
Overall, I'm happy with the use of colour. I think the colours do enhance each other and create a vibrant contrast that evokes a feeling of hot summer nights.
Exercise: Still life with colour used to evoke mood
Make decisions in advance about the range of colours that you will use. You’re aiming to create a mood or atmosphere in your use of colour and handling of paint. You could, for example, heighten effects by exaggerating contrast or making certain hues brighter than they appear. Conversely, you could soften or mute colours for a gentler or even more sinister effect. You could aim to create a chilly and distant feel or a warm and intimate atmosphere. While the subject may be prosaic, your handling of it need not be. In this exercise you can explore the more expressive and subjective aspects of painting.
For this painting I really wanted to try something I hadn't really tried before. In a previous still life research task, ones of the artists that I looked at was Braque. He really liked using quite geometric shapes in his work and often depicted his work in a flat plain.
To start with I had to find the right angle for my still life in order to make the lines work. The angle of this image is slightly different to the previous one, which allowed likes to meet or extend in places to create a better flow. I first printed out a photograph of my scene so I could experiment with where to create my geometric lines. I started by flattening all objects in the scene and extending their lines. I then added lines where needed to fill the composition. I painted straight onto the photo with acrylics to decide which colours I want to use. I wanted to keep the colours of the actual objects similar to their own, but keeping them flat. For the background I wanted to experiment with colours more.
When creating the fuller size painting, I had to adjust lines slightly because of the scale change. I laid down the lines first with permanent marker. I used combinations of warm colours for the background as this is the mood I wanted to create. the contrast between the coll blues and reds. For the first layer, I used the paints straight from the tubes s shown in image 5. The only colour I had to mix was the Burnt Sienna, which I did with dark brown, raw sienna and true red. Once the layer had dried, I used my mixture of Burnt Sienna and created a glaze with turps. I applied this over the background colours using my finger to create texture.
I'm happy with the result and like the contrast created. The image feels warm and interesting. I like the harshness of the black lines, and the fact that the background is quite warm and that the glaze has created a similar tonal feel.
Project Drawing and painting interiors
A major challenge in painting or drawing an interior is simplifying or finding focus in the complexity of the subject. The other formal problem is the creation of an illusion of three dimensional space. The seventeenth-century Dutch paintings of domestic interiors, often referred to as genre paintings, became popular amongst the growing middle classes of the most affluent country in Europe. Figures in interiors by Johannes Vermeer, Samuel van Hoogstraten, Jan Steen and many others, made great art out of scenes of ordinary life.
Research Point
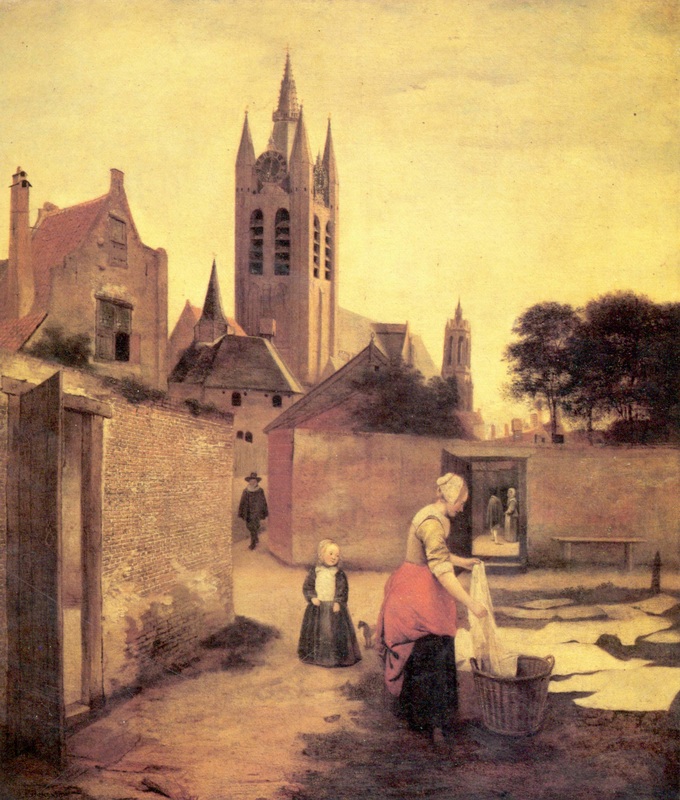
 The Little Street, c. 1657 - 1661
1. Research the work of the Dutch realist genre painters and choose two or three paintings that particularly appeal to you. Find out what you can about the artist and their intentions. Look at the devices employed by the painter to draw the viewer into the experience of the occupants of the room.
During the Middle Ages and Renaissance time periods, painting mostly depicted religious themes, Due to a divide in the church between Protestants and Catholics, there were groups who became fed up with conflicting religious ideologies and shifted their attention to the accomplishments of men. Artists started celebrating the man made objects, accomplishments and the every day mundane. The Dutch artists of the 17th century were at the forefront of making these types of realists every day subjects a common and celebrated institution.Often focusing on landscapes, architecture and people involved in daily chores.
Jan Vermeer (1632-1675)
Jan Vermeer was a well known Artist during this time. He commonly painted Dutch architecture and citizens in a way that depicted their conservative and laid-back lifestyle. He embraced the basic theoretical tenets of the art of his time and fully adhered to common technical procedures of his school. He is well known for his treatment of light in his work and focusing on how light bursts into a scene creating wonderful reflections and shadows on different surfaces. He achieved this with a method called pointillé. It is thought they he may have used camera obsura to help him achieve his position of lines and composition. As depth and and perspective are highly evident in his work.
The little street is a popular example showing the tranquility of his home town Delft. In a cobblestone street are two houses with a gate opening onto the passageway between them. A woman sits in an open doorway, busy sewing as two children are playing on the stoop. Historians believe it is likely a combination of elements of architecture and not just one specific scene. His style truly captures the conservative atmosphere of Delft.
Vermeer identified himself with his native culture. Vermeer liked to portray the highest cultural and scientific achievements of his countrymen and here we get the sense that he is celebrating the architecture of a simple yet structured life
The painting conveys a quiet built-up street, a house and four small figures - two women occupied by mundane tasks, and two children playing. The house seems to shelter and protect the inhabitants. Though the artist gives the viewer only an exterior view, there is still a sense of intimacy. The naturalistic style of this piece is what adds to this intimacy, as the viewer feels like they are getting a peak into the life of Delf citizens. There is a sense of equilibrium in his composition and his decision to cut of parts of the buildings makes the scene so much more intriguing. Depth of field is achieved well through his placement of buildings in the background as well as through his well used techniques of streaming light. The use of perspective in the narrow passage further brings a natural and realistic element.
 Woman holding Balance, 1662 - 1665
In his painting, Women holding balance, a woman is shown in an interior space holding a balance scale. You may at first view this as him capturing another intimate moment of woman attending to her finances, however this image in particular, is filled with symbolism in it's design. The picture on the wall behind the woman is the clue to the symbolic meaning of this picture. It shows a last judgment, a theme that was usually represented in art by scales, where good and bad deeds were weighed. The analogy between the last judgment painting and the scale held by the woman, made it obvious to anyone at the time that there was a meaning behind this image. It was meant to remind viewers of the need to live moderately, to carefully weigh one's actions.
Vermeer was very meticulous in his work and we notice many other techniques that make this image quite spectacular. Many of the objects in the room echo each other through the use of colour, angles and hard lines. Like the frame, mirror and table, as well as the blue colour of the cloth and the coat, as well as the gold in the curtain repeated in the skirt and frame. The painting lures us into this web of echoing forms and colors. It slows us down and engages us to contemplate this frozen moment. This is a feeling often caused by Vermeer paintings.
X-rays taken of some works by Vermeer show that he moved elements around as he was painting, a curtain for example, or a map or a mirror hanging from a wall. Sometimes he painted this kind of object and then he covered them up.This shows that Vermeer did not simply record a reality that existed before his eyes. He combined elements at will to create carefully balanced compositions.
2. Look at interiors that have been painted by various artists from different periods. Look especially at how illusions of space have been created, how doorways and windows form a part of the composition and how furniture and objects are depicted either as a central focus for the painting or as secondary to any human drama.

Jonathan Leaman
A Jan Steen Kitchen 1995–6
The subject of this painting is the conception of children and Leaman presents this as a feminine activity that is simultaneously mysterious and physical.
Perspective is evident in the angling of the wall lines. The clutter of many subjects in the foreground, middle ground and background particularly ads to the illusion of space, in this instance, making the space feel smaller, which I believe is the intention.
The use of light also creates depth in the image. the areas under the light are lighter and warmer then the other parts of the room. We also see a brilliant burst of light coming in at the back entrance, expanding the room into what is possibly the front entrance. The people and the furniture add to the chaos in this space. There is the need to bring a bed into the kitchen as the family is expanding so rapidly that there is nowhere else to put them. The artist is clearly drawn to angles and how they can create a contrasting juxtaposition. We see this in the variety of angles used for chairs, furniture and tables, as well as through the placement of open doors and windows. I would assume this is metaphorical for the fact that symmetry and balance would be difficult to maintain in this particular family situation.

Frank Bramley
A Hopeless Dawn 1888
Looking at the lines of the walls, table and window of this painting, you notice your eye being drawn to the vanishing point which is towards the left window frame. The placement of the figures also helps to create depth, particularly with the young girls feet and dress being draped to the foreground. The wooden panels on the floor are also running in angles to create a vanishing point, further adding to the perspective and three dimensional effect. the artist has also made great use of streaming light to highlight particular angles and lines in his painting, which adds further depth to the image, but also places the figures slightly more in the dark which is symbolic of their temperament.

Edward Burra
The Snack Bar 1930
Depth is created with the largeness of the cured meet being cut in the foreground to the smaller pair of legs peeping out in the doorway in the left background. The artist has drawn their vanishing pint towards those pair of high heeled shoes. This is also evident when looking at the lines of the shelves at the back as well as the bar top. It is really important that lines are not just drawn in parallels, but that the angling helps to create a perspective that helps to create a three dimensional space, and to see the painting as an eye would see it. The artist has acheived this realistic view very well, while sticking to their own style and aesthetic. I also appreciate his use of contrasting red and green, while keeping the rest of the palette mostly white.
Exercise: Quick sketches around the house
To begin with, look around your chosen space from a standing position. Working with pencil and an A4 sketchbook make four quick sketches of what you see by looking in four directions in succession. When you’ve completed one drawing, move 45 degrees to change your position. Don’t get concerned with detail, just focus on important lines, positive and negative
shapes or areas of tonal contrast.
Standing Sketches
shapes or areas of tonal contrast.
Standing Sketches
We’re accustomed to viewing tabletops, window sills, cupboards and work surfaces while sitting, so now do a drawing survey of the room by changing positions four times while seated.
Seated Sketches
Seated Sketches
Research Point
Before you attempt the next exercise, go on the internet and research the basics of linear perspective.
You’ll discover that linear perspective has one basic rule: receding lines which are actually parallel appear, if you extend them, to meet at a point on your eye level. This point is called the ‘vanishing point’. The eye level is often referred to as the ‘horizon line’ or simply the ‘horizon’. When you look at a perspective drawing or painting, the eye is drawn in to the vanishing point and this creates a sense
You’ll discover that linear perspective has one basic rule: receding lines which are actually parallel appear, if you extend them, to meet at a point on your eye level. This point is called the ‘vanishing point’. The eye level is often referred to as the ‘horizon line’ or simply the ‘horizon’. When you look at a perspective drawing or painting, the eye is drawn in to the vanishing point and this creates a sense

In this exercise, you will focus on creating an illusion of space. Drawing interior spaces is a good way to understand perspective. Notice how the straight lines of walls, floors, tables, shelves, doorways and windows could continue on until they converge at the imaginary vanishing point on the horizon line, which is at your eye level.
The idea that objects of similar size appear smaller as the distance between the objects and a viewer increases is referred to as linear perspective. Objects containing parallel lines will have one or more vanishing points in relationship to the perceived eye level, which is associated to the horizon line in nature. In the image on the left we can see the lines converge into the vanishing point. when drawing or painting still lifes, interiors and architectural structures, it is important to know how to look for the horizon in order to create an appropriate perspective.
The idea that objects of similar size appear smaller as the distance between the objects and a viewer increases is referred to as linear perspective. Objects containing parallel lines will have one or more vanishing points in relationship to the perceived eye level, which is associated to the horizon line in nature. In the image on the left we can see the lines converge into the vanishing point. when drawing or painting still lifes, interiors and architectural structures, it is important to know how to look for the horizon in order to create an appropriate perspective.
Urban Water Colour Workshop
I attended a Watercolour Workshop with one of my previous students, Rainbow Tze. She is well known for her urban water colours of Hong Kong. The sessions start with her doing a demonstration of her methods. Thereafter the students try to mimic her style or use her particular methods. It was very interesting to see how she uses the medium and how confident she is in her work. It is clear that she has had a lot of practice. I didn't necessarily learn new Water colour techniques, but it did push me to painting architecture or outside scenes, something I was too scared to do before. You can view more images of the workshop and her work here.

|

|
Neither of the a are complete, as I ran out of time. I'm still quite pleased that I have embraced the possibility of painting urban scenes, and realize that is not nearly as daunting as I thought it would be. I hope to finish these sometime in the future. The images also show perspective quite well.
Exercise: Simple perspective in interior studies
Are any areas of your painting particularly convincing? Does any part of the painting look wrong? Why do you think this is?
I decided to paint this corner from our living room, as I felt it had the most interesting composition. I also really liked the effect created by the light and how it cast shadows around the furniture. I decided that I wanted to work with a limited palette, as I really wanted the focus to be on the light source and the mood it is creating. I chose to work with Payne's Grey and Yellow (Bright, Naple and Cadmium). Because Payne's Grey has a blue undertone, it created a very muddy green, which I felt actually added to the atmosphere quite well. I am quite happy with how the image turned out. I feel that you can see the perspective and focal point well, and the use of yellow really makes the room feel warm and inviting. The only thing that doesn't quite feel right is the angle of the right leg. It is slightly slanting to the left. As I had to work mostly from the photograph, it made the image quite dark and difficult to distinguish lines.
I was also a bit frustrated with myself, as I decided to use a ruler to create the straight lines of the interior architecture, and accidentally used a dark graphite pencil. The yellow colours were not strong enough to cover them when painting, so they still appear quite prominent. Next time I will make sure to use a lighter charcoal pencil instead.
Assignment 2
Your painting for this assignment should demonstrate your understanding of colour, tone, composition and the development of your technique in your chosen medium.
I found it very difficult to decide on a subject for my still life. I walked around the shops quite a bit and looked for inspiration, but options can be limited in Hong Kong where I live. In part 1 we did monochrome exercises and I quite like they idea of working with a limited palette. In some of my own previous works, I have also favored working with less colours to create a painting. Although, that being said, even though you say limited palette, you still end up using quite a variety of colours within the same he in order to create depth.
While researching examples for still lifes in some of the previous research tasks, I happened to come across an image of old tennis shoes and a can of soda. It was such a strange combination, but the application of the paint and positioning of the objects made it feel poetic. So that is what inspired me to paint my chosen subject. I also wanted to incorporate some of the typical elements we often see in still lifes, cloth and chrome.
My goal was to take an every day object that is not particularly glamorous, and depict it in a way that makes is soulful and poetic. This meant using colours that would create a mood or sense of feeling. I knew that I wanted to keep the colours cool, as this would make the image feel relaxed and quiet. Basically a metaphor for how I see my workouts. I do pretty intense strength training, but despite this, it is what keeps me sane and calm. It is a form of relaxing at the end of the day. This is the equipment that keeps me in shape and healthy and I want to celebrate them.
I started by adjusting and readjusting the positions of the three chosen objects and taking photographs from various angles until I found the composition I was happy with. I did not end up doing various sketches from various angles and the photographs really helped me to decide what angle and composition I like. I did still want to do a sketch, as I wanted to be sure I could recognized the slight variations in tone, particularly on the shoes, as the matte texture of the material makes it hard to distinguish varied tones. I made my sketch in ink, because I like the stark contrast and effect created by the harder lines. The sketch was still very useful in helping my anaylize the curves and lines of the objects which helped me to place highlights or shadows in the relevant places.
I started with the background first. I wanted to create a background first that has varied tonal values or depth. I used combinations of black and white acrylic and watercolour paint. I wanted it to appear a bit cloudy or foggy, so I diluted part of it and used my hands and a sponge to spread it and move it around. I had decided to keep the image in the black and white range, using lamp black, ivory black and titanium white, as this was close to the colour of the composition anyway. However, after completing the first layer, I felt that the image lacked depth, so I started including Phato Blue and light grey in my mixtures. I wanted to keep the style a bit more impressionist but still true to the subject. It was quite hard for me to decide which parts to show more specifically or what to edit out. As an artist I think I'm still growing in my ability to edit things out and not be tempted to just paint things as I see them. I used the colours quite boldly to lay down the foundations of the image and then used small brushes for finer details. I created glazes with my mixtures and used them to add depth in other areas, particularly shadow ares where they have a slightly varied tonal value. I specifically used these glazes to continue adding depth to the background as well, again either using a sponge or my fingers to create texture.
I think that I have accomplished the mood or feeling that I have set out to. I have taken an unconventional still life subject and made it feel poetic and celebrated. I'm happy with my decision to keep a limited palette and the choice of including blue. Though it might not seem quite that way, I was much more loose in my application of paints and taking a few more risks in how I chose to highlight and shadow my work, which is a big step for me. I also enjoyed incorporating what I had learned in previous exercises, using sponges, brushes and glazes to add interest.
Reflecting on Tutor Report
The tutor felt that I was being to safe with my choices, and that I need to explore colours and tones more. She feels that I am too reliant on the work of others and should start exploring my own interpretations. I feel that these comments are harsh and deflating at times. I have not studies art before and did not take art at school. I am using inspiration from others, as the activities are set up in such a way that it seems like that is what is expected. Every time I experiment or produce a new piece of work, it is my first time doing it, so all things considered I think it is okay that I am learning to crawl before I run. I will continue to push my boundaries and explore new ways to look at work. I agree that I could have been more ambitious with my still life composition. I will try to be more descriptive and self reflective regarding my process.
